-
Notifications
You must be signed in to change notification settings - Fork 13
Social Media Tags
You're currently viewing XMPL V3
Attention: XMPL V5 beta is now available!
You can add buttons to your webpage to share information on the recipient's Facebook feed, or on their Twitter account. The user will click the button, will then be usually asked to log on to the respective account (Facebook or Twitter), and then a message will be posted in the user's name.
You can do this either directly with the Facebook or Twitter JavaScript infrastructures, or rely on XMPL tags.
The following entry provides details about these tags. The basic "index.html" contains examples for using the share tags.
Sharing through Twitter is very simple. You can set the message and ask to refer to a URL. Usually the URL will lead to the company site or campaign. You can defo personalize the message based on the recipient data.
Consider the following example from "index.html":
<a xmp-twitter-share
   xmp-url="http://www.pdfhummus.com/"
   xmp-shared-text="[attribute] I am {{ xmp.r['First Name']}} {{ xmp.r['Last Name']}}, and i approve this URL">
   Tweet</a>
The anchor element has three attributes forming the Twitter sharing functionality:
-
xmp-twitter-share- the basic attribute making this element a Twitter sharing element. -
xmp-url- the URL to put in the message for reference. It will appear as a link in the tweet. -
xmp-shared-text- the shared tweet message. Notice how personalized data is used, with the regular ADOR literal references.
You can also use xmp-twitter-share as an element, instead of an attribute:
<xmp-twitter-share
      xmp-url="http://www.pdfhummus.com/"
      xmp-shared-text="[element] I am {{ xmp.r['First Name']}} {{ xmp.r['Last Name']}}, and i approve this URL"
/>
The result is identical.
XMPL provides a tag for the recipient to post a preset message on their Facebook feed. It is almost as simple as creating a Twitter share, other than Facebook requiring the posting 3rd party (namely, our website) to identify itself. This requires Facebook registration and launching the share from a particular registered domain. We'll discuss this later. First let's look at the HTML to add.
Form "index.html":
<button type="button" class="btn xmp-facebook-share-btn"
    xmp-facebook-share
    xmp-appID = "THE_APP_ID"
    xmp-target-link = "http://localhost:8080/register.html"
></button>
When the user clicks this button a dialog appears asking to share. The behind the scenes XMPL tags use the Facebook feed dialog method. Facebook provides a thorough explanation of this here.
Let's look into the button attributes:
-
xmp-facebook-share- the basic attribute making this a Facebook feed post button. -
xmp-appID- the posting application ID. This will be an ID issued by Facebook for the posting entity application. We will create one later. -
xmp-target-link- the URL to be shared. This is the webpage that is shared. This should be an absolute URL, which the Facebook users can reach.
Read about how your content appears on Facebook at https://developers.facebook.com/docs/sharing/webmasters
You can also use an element version of this tag, where xmp-facebook-share appears as an element. See the example here.
Note that as opposed to Twitter share, due to the part that identifies the posting party (the Facebook App ID), the button will function correctly only if the page is launched from the domain registered to the App ID.
Registering an App ID on Facebook is a common Facebook API practice. Here is the official guide https://developers.facebook.com/docs/apps/register.
In the next entry we will provide a quick guide for making the XMPL button work.
Let's assume that you or the company for which you develop the site have a Facebook account. You can continue with the following steps:
- Go to the developer applications area at https://developers.facebook.com/apps/. You may need to register if this is the first time that you develop anything based on Facebook. When you are done, return to https://developers.facebook.com/apps/.
- Click the "Add a New App" button.
- In the dialog box, enter a descriptive name for your new application. For example: XMPie Xbliffer. Then click "Create App ID".
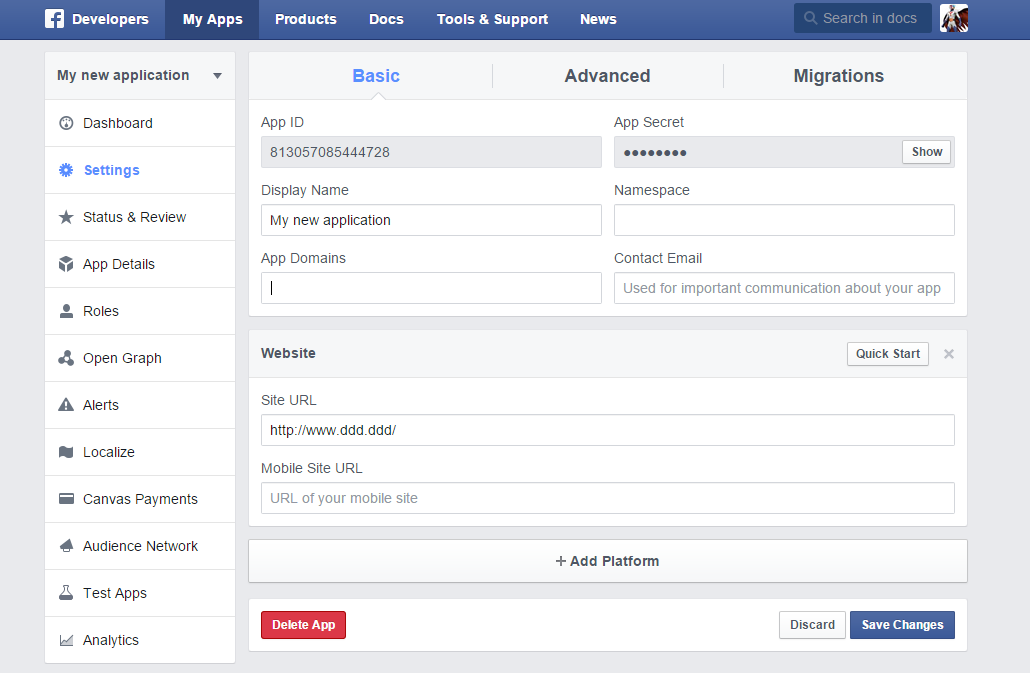
- On the sidebar select Settings > Basic, and then click + Add Platform at the bottom of the page.
A dialog box opens asking you to choose the type of application. Select Website. - Add the site URL, and then click Save Changes.
One more thing you must do is register a domain to associate with the App ID. This should be the same domain from which you will launch the website.
The browser window should look like this:

To register the domain:
- Go to the "App Domains" field.
- In it type the domain from which you will launch the website that has the sharing button. Note that you need to write only the DOMAIN part of the URL, and not all of it.
- It is possible to add more domains to your applications. You may use multiple websites and domains with the same application ID.
- When you are done, click "Save Changes".
It is now time to gather information about what the users are doing in the website, which pages are viewed, for how long, what buttons are clicked, and what links are followed. For detailed information go to Web Analytics.
You're currently viewing XMPL V3. Alternatively, go to XMPL V5 beta.
New!! Take a look at XMPL V5 Beta