Deploying Pre Built Binaries
(Note: An abridged version of this procedure is described here [Deploying Pre Built Binaries Abridged](Deploying Pre Built Binaries Abridged))
Each released version of Dash is published to a download site which may be used to deploy Dash without having to clone the repository and build the software.
The structure and layout of the download site is described here: [Download Site Package Description](Download Site Package Description).
To successfully deploy a new instance of Dash two files are required; an Azure Cloud Service Package file and its associated configuration file. You will also need to determine if you want to support an HTTPS endpoint on your deployment (this has implications for both the files that you require as well as the process to deploy).
The URLs required to obtain the necessary deployment files are:
HTTP Only
https://www.dash-update.net/DashServer/latest/http/DashServer.Azure.cspkg
https://www.dash-update.net/DashServer/latest/http/ServiceConfiguration.Publish.cscfg
HTTP & HTTPS
https://www.dash-update.net/DashServer/latest/https/DashServer.Azure.Https.cspkg
https://www.dash-update.net/DashServer/latest/https/ServiceConfiguration.PublishHttps.cscfg
Once you have determined which package you require for you deployment, use a standard web browser to download the files from the corresponding links above and save them on your local hard drive. The Azure Portal deployment method works best with local files.
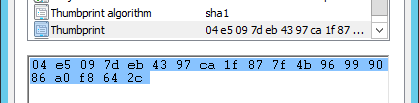
If you want to use HTTPS to secure communications to Dash you will need to obtain a custom domain and a verifiable certificate issued for that domain. See https://azure.microsoft.com/en-us/documentation/articles/cloud-services-configure-ssl-certificate-portal/ for a full description of obtaining a SSL certificate. Once you have obtained a certificate, you will need to extract it's sha1 thumbprint (see image using the Windows Certificate Manager application). This thumbprint (with all spaces & unicode markers removed) must be copied into the ServiceConfiguration.PublishHttps.cscfg file as described in the above article:
<Certificates>
  <Certificate name="TlsCertificate"
		thumbprint="04e5097deb4397ca1f877f4b96999086a0f8642c"
		thumbprintAlgorithm="sha1" />
</Certificates>
(This is an optional step as it may be performed after the service has been deployed). The Dash Management Portal is secured via Azure Active Directory which must be correctly configured prior to authenticating requests.
See Configure Authentication for Management API for full details.
You may create a new service for Dash and deploy the packages to it via the Azure Portal https://portal.azure.com. Execute the following steps to deploy a new Dash service:
- Log in to the Azure Portal https://portal.azure.com using credentials that have co-administrator access to the subscription you wish to deploy the Dash service into.
- Click the '+ New' button, followed by the 'Compute' heading, followed by the 'Cloud Service' option:

- Click the 'Create' button on the summary page to display the data entry blade for your new Dash service.
- Enter an unique name for the Dash service. This name will be used to construct the DNS endpoint name that your storage clients will need to specify when connecting to the Dash service (eg. http(s)://mydashstorage.cloudapp.net)
- Select the subscription, resource group and location as desired.
- Click the 'Package' link.
- Enter or select an existing storage account that will be used to temporarily stage the deployment artifacts. This storage account will not be used as part of the Dash virtual account.
- Enter a deployment label (eg. 'Initial DASH deployment from portal')
- Select the package file (.cspkg) and empty configuration file (.cscfg) from the location on your local hard drive where you downloaded them earlier. Note: If you are deploying Dash with an HTTPS endpoint, ensure that the ServiceConfiguration.PublishHttps.cscfg file has been updated with the TLS certificate's thumbprint prior to executing this step.
- Ensure the 'Production' environment is selected. Also make sure 'Start Deployment' is selected.
- Click the OK button to return to the previous blade.

- (The next 2 steps are only required if deploying HTTPS endpoint) To use HTTPS to verify the server and encrypt data a valid SSL certificate must be deployed with the Dash service. Click the 'Add Certificates' link and attach the certificate (in .pfx format), specifying the correct password for the certificate. Click OK.
- As described earlier a HTTPS certificate may only be issued for a custom domain name. Use the tooling provided by your domain administrator to create a 'CNAME' entry pointing your custom domain name to 'mydashstorage.cloudapp.net' (where mydashstorage is the name specified in step 4 above).
- Click the 'Create' button to create the Dash service, provision the initial set of virtual machines and deploy the software to them.
Now the Dash service is running in Azure, but it cannot function as a virtual account storage endpoint until appropriate configuration changes. These changes can all be applied using the Dash Management Portal.
Prior to being able to use the Management Portal, the correct authentication configuration must be estalished in both Azure Active Directory AND the Dash service. See Configure Authentication for Management API for full details. Now that the service has already been deployed, you must use the Azure Portal to modify the authentication configuration for Dash, as described in the above article.
When you are able to access the Management Portal (http(s)://mydashstorage.cloudapp.net:8080/), the minimum set of configured attributes to get the Dash service functioning as a valid storage endpoint are as follows:
| Configuration Name | Configuration Value |
|---|---|
Account Name |
The name of the virtual account. This must be specified when signing requests as per the Azure Storage protocol |
Primary Key |
The storage key used to sign requests as per the Azure Storage protocol |
Namespace Account |
Details of the Azure Storage account used as the namespace account |
Storage Account |
At least 1 (preferably more) Azure Storage account to be used as data accounts containing the sharded blobs |