-
Notifications
You must be signed in to change notification settings - Fork 4
Getting Started with Android Firmata and NodeMcu Board
Starting with 1.6.4, Arduino IDE allows installation of third-party platform packages using Boards Manager.
-
Install the current upstream Arduino IDE at the 1.8 level or later. The current version is at the Arduino website.
-
Start Arduino and open Preferences window.
-
Enter
http://arduino.esp8266.com/stable/package_esp8266com_index.jsoninto Additional Board Manager URLs field. You can add multiple URLs, separating them with commas.
-
Open Boards Manager from Tools > Board menu and install esp8266 platform (and don't forget to select your ESP8266 board from Tools > Board menu after installation).

See https://github.com/esp8266/Arduino for more information.
-
Download and install the SiLabs serial driver for the chip.
-
Plug in your NodeMcu board via USB, and make sure the serial port is available:
# Make sure the '/dev/cu.SLAB_USBtoUART' exists
$ ls -lah /dev/cu*
> ...
> crw-rw-rw-  1 root  wheel   38,  11  5 31 23:51 /dev/cu.SLAB_USBtoUART
-
If it still not working, change another cable may help... 😅
See https://github.com/nodemcu/nodemcu-devkit/wiki/Getting-Started-on-OSX for more information.
-
Open the Arduino IDE, select: File > Examples > Firmata > StandardFirmataWiFi

-
Modify these lines in file "wifiConfig.h":
// STEP 3 [REQUIRED for all boards and shields]
// replace this with your wireless network SSID
char ssid[] = "your_network_name";
...

// STEP 4 [OPTIONAL for all boards and shields]
// If you want to use a static IP (v4) address, uncomment the line below. You can also change the IP.
// If the first line is commented out, the WiFi shield will attempt to get an IP from the DHCP server.
// If you are using a static IP with the ESP8266 then you must also uncomment the SUBNET and GATEWAY.
#define STATIC_IP_ADDRESS  192,168,1,113
#define SUBNET_MASK        255,255,255,0 // REQUIRED for ESP8266_WIFI, optional for others
#define GATEWAY_IP_ADDRESS 192,168,1,1   // REQUIRED for ESP8266_WIFI, optional for others
...

// STEP 6 [REQUIRED for all boards and shields]
...
char wpa_passphrase[] = "your_wpa_passphrase";
...
-
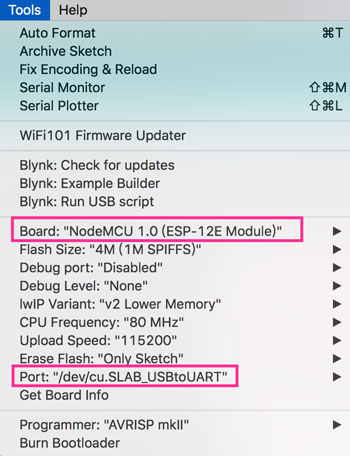
Open Tools, select corresponding Board and Port

-
Hold the Flash Button on the NodeMCU board and Click the "Upload" button.
On your Android Device, open: Settings > WLAN, you will find an Access Point with a name like ESP_XXXX, connect it.

By default the network is open, and the IP Address is 192.168.4.1.
Now you can change the Transport URI to tcp://<nodemcu_ip_address>:3030 in your Android Program.
/**
 * If you are using the NodeMcu as an Access Point, then the URI should be:
 *
 *   "tcp://192.168.4.1:3030"
 */
connectBoard("tcp://192.168.4.1".toTransport(), {
    ...
})