
This is a temporary repository created to port the brackets-git extension into Phoenix Code. It serves as a tracking mechanism to understand and document all changes made to the original extension, providing reference for future development. This repo will be archived once the extension is successfully merged into Phoenix Code.
The original extension was written in TypeScript, and as Phoenix core will be pure JavaScript, we need a JS implementation. Fortunately, the extension was originally written in JS with TypeScript sprinkled only for code hints in older versions of VSCode. The TypeScript compiled output was usable as-is with comments and structure intact. We copied the compiled extension as the base and build from there.
Platform support includes Windows, Mac OS X, and GNU/Linux. In browsers, we could use isomorphic-git, but this requires changes to our filesystem access backed VFS to add support. While browser filesystem APIs don't support changing file modes (e.g., read-only, executable flags), we could implement read-only mode to help browser users view changes in UI. Since isomorphic-git supports filer, we need modify our vfs to make it compatible with isomorphic-git.
To make Brackets-Git work you'll need Git installed in your system:
-
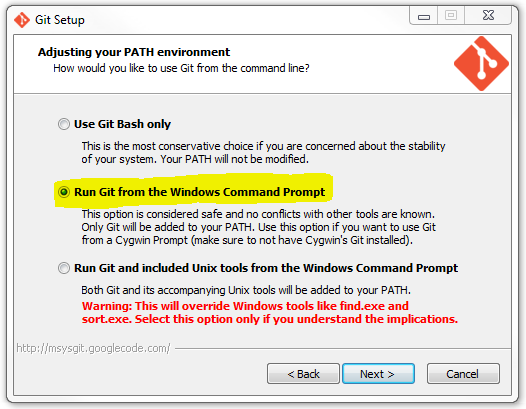
Windows: Git for Windows is recommended with these settings.
-
Mac OS X: Git for Mac is recommended.
-
GNU/Linux: Install the package
git:- Debian/Ubuntu using this guide:
sudo add-apt-repository ppa:git-core/ppa sudo apt-get update sudo apt-get install git- RedHat/CentOS/Fedora:
sudo yum install git
To install latest release of Brackets-Git use the built-in Brackets Extension Manager which downloads the extension from the extension registry.
Extension can be configured by opening the Git Panel and clicking the  button.
Alternatively you can use
button.
Alternatively you can use File > Git Settings... in the Brackets menu.
You can find some samples of features here.
Currently Brackets-Git supports these features (this list may be incomplete as we add new features regularly):
init/clone/push/pullcreate/delete/mergebranchesselect/define/deleteremotescheckout/resetcommits- show commits history
- manage different Git settings
- support for Git-FTP (installation instructions)
A comprehensive list of Brackets-Git features is available reading the CHANGELOG.md.
Most of the features available are configurable and it's possible to enable and disable them selectively.
If you can't find the feature you were looking for, feel free to open an issue with your idea(s).
Pull/Push to password protected repositories:
Push/Pull from and to password protected repositories is partially supported, currently it works only with http / https repositories.
The Git Credential Manager for Windows (GCM) is recommended to manage password protected repositories, Brackets-Git will eventually provide better support for them. You'll need to push manually the first time to setup your username/password into the credentials helper.
Working with SSH repositories: SSH protocol is currently a bit more difficult, so you'll have to use command line or try to follow these tips:
-
Linux
-
Mac OSX
-
Create a ssh pair key with the following command on the terminal
$ ssh-keygen -t rsa -b 2048 -C "[email protected]" -
Enter a
"Secure"passphrase or alternativly hitEntertwice if you dont want a passphrase"Not Recommended" -
You should be given a string like the following
"99:ff:ff:4b:bb:2d:d3:17:h6:6d:f0:55:4d:f0:b4:db [email protected]" -
Pay attention to this line
"Your public key has been saved in /Users/USERNAME/.ssh/id_rsa.pub."the *.pub is what you want here, take note names may vary. -
Now start the SSH agent
"eval "$(ssh-agent -s)" "Which should give you output like this"Agent pid 77398" -
Next type
"ssh-add ~/.ssh/id_rsa" -
Next we want to copy the SSH key into your clipboard, there are two ways of doing this.
-
Method #1 type into Terminal
"pbcopy < ~/.ssh/id_rsa.pub"taking note of before that "Your file" is names"id_rsa.pub". If it is not, change it to whatever yours may be called. That's it proceed to next step. -
Method #2 if for some reason you can't do method #1 this is your alternative. Find the id_rsa.pub key or otherwise named.pub key and open it with a text editor, copy the while key including email into your clipboard (command + c). That's it.
-
DO NOT DELETE THE FILE!
-
Now we add the
SSHKEYFILE.pubto the authorized_keys onto the git server (github website).- Login to Github
- Click the COG to the top right (settings)
- Click the left hand side menu
"SSH KEYS">> ADD NEW SSH Key - Input the name of this key, in my instance I named it
"Macbook Pro Git Key" - Paste your key with (command + c) or right click Paste
- Click
"ADD KEY"and you're done (NOTE: You may be asked for a password)
-
Now to test if everything is Working In Terminal Type after the $
"ssh -T [email protected]"Type"Yes"And close. -
If it does not connect, check your Internet and that you have not missed a step :)
-
-
Windows (Go to point 3 if you have already a rsa key already generated)
- Create a ssh pair key with PuttyGen RSA with 2048 bytes. Don't add any password. Save the PPK and upload the public key to the git server.
- Add the PPK key to the Putty agent.
- ONLY IF YOU HAVE A RSA Key already from the server. You need to convert the private key to PPK. With PuttyGen load the sshkeyfilename (this file comes without extension, after loaded save it as private key. After that load this key in Putty Agent.
- Insert (if not already) the pub key to the server inside the folder
/root/.ssh/authorized_keys. (edit withvithe fileauthorized_keysand paste the pub key content on the file.) - Putty manage the private keys with a SSH agent always present in the task bar.

Main panel of Brackets Git

History panel of Brackets Git

Details view for a specific commit

Commit dialog

Settings dialog
Please see CONTRIBUTING.md