-
Notifications
You must be signed in to change notification settings - Fork 0
Troubleshooting
- Error 6 on ssh
- Folders closing on raspberry pi
- OpenmvIDE install on raspberry pi 4
- Create a desktop shortcut for openmvIDE
- Create a desktop icon for the app in Ubuntu
- VNC black screen
If you find "Error: 6" on the Rapsberry Pi network app, it's likely due to the connection between the central computer and one of the raspberry pis being modified by changes in IP (the new IP of the raspberry Pi is not trusted by the central computer). This will prevent data transmission (you will have missing data when you try to retrieve it from the Raspberry Pis). The way to solve it, is to ssh manually into the Pi.
ssh pi@new_ip_address
# accept the new address trustworthy and close terminal
This can be solved by doing a distribution upgrade. Followed by a reboot.
sudo apt-get dist-upgrade
sudo reboot now
The install of openmvIDE can give some errors.
This is because the raspberries are likely needing extra libraries to be able to work. From a terminal, do:
sudo apt-get install libgles2-mesa-dev -y
sudo apt-get install libpng-dev
sudo apt-get install libpng12-dev -y
sudo apt-get install qt5-default -y
sudo apt-get install libts-dev -y
Then, from the openmv folder, do install
bash setup.sh
To create a desktop shortcut do:
nano ~/Desktop/openmvide.desktop
And enter the following content
[Desktop Entry]
Type=Application
Comment=openmvIDE
Name=openmvIDE
Exec=/home/pi/openmvide/bin/openmvide.sh
Icon=/home/pi/openmvide/openmv-logo.jpg
Terminal=false
Categories=Utility
StartupNotify=true
Press Ctrl+O and press Enter to write the file to openmvide.desktop. Ctrl+X to exit nano.
To get the icon to show up, download from here and save it using:
curl https://cdn.shopify.com/s/files/1/0803/9211/products/brand_logo_grande.jpg?v=1492970647 > /home/pi/openmvide/openmv-logo.jpg
This should create a desktop icon for openmvIDE.
TODO:add picture here
The process is very similar to what's described for openmvIDE. There are minor differences. Here's the HomecageApp.desktop file:
[Desktop Entry]
Type=Application
Comment=HomecageApp
Name=HomecageApp
Exec=/usr/bin/Rscript -e "shiny::runApp('~/raspberry_IP/app.R', launch.browser=TRUE)"
Icon=/home/choilab/homecage_quantification/docs_img/rpi_logo.jpg
Terminal=false
Categories=Utility
StartupNotify=true
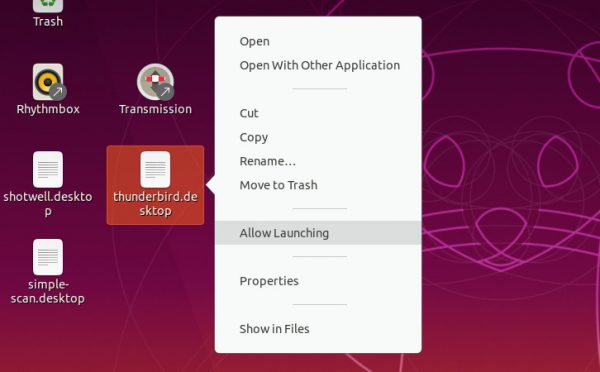
A crucial step after saving this file is allowing it to launch. Here's an example with the thunderbird app
You log in using user and password to a raspberry pi.
Problem: VNC viewer says "cannot show display"
This arises from the fact that the raspberry is not connected to a monitor. Because of that, it cannot choose a resolution to show. To be able to use VNC to connect to a raspberry that has no monitor, we have to force it to output video anyway at a certain resolution.
There's two ways to do this:
ssh way
ssh pi@IP_addres
sudo raspi-config
It will show a screen that looks like this:
┌───────────────────┤ Raspberry Pi Software Configuration Tool (raspi-config) ├────────────────────┐
│                                                                                                  │
│        1 Change User Password Change password for the current user                               │
│        2 Network Options      Configure network settings                                         │
│        3 Boot Options         Configure options for start-up                                     │
│        4 Localisation Options Set up language and regional settings to match your location       │
│        5 Interfacing Options  Configure connections to peripherals                               │
│        6 Overclock            Configure overclocking for your Pi                                 │
│        7 Advanced Options     Configure advanced settings                                        │
│        8 Update               Update this tool to the latest version                             │
│        9 About raspi-config   Information about this configuration tool                          │
│                                                                                                  │
│                                                                                                  │
│                                                                                                  │
│                           <Select>                           <Finish>                            │
│                                                                                                  │
└──────────────────────────────────────────────────────────────────────────────────────────────────┘
Select 7 Advanced Operations
Then select 5 Resolution and choose a resolution.
Go to Finish and after reboot the correct resolution should be set
boot/config.txt way
This is the current implementation in
setup.shfor the project
The general idea is to use this pattern:
sudo sh -c "echo 'your_text_here' >> /boot/config.txt"
To put all of this into config.txt
# uncomment if hdmi display is not detected and composite is being output
hdmi_force_hotplug=1

# uncomment to force a specific HDMI mode (this will force VGA)
hdmi_group=2
hdmi_mode=82
This is accomplished by.
sudo sh -c "echo 'hdmi_force_hotplug=1' >> /boot/config.txt"
sudo sh -c "echo 'hdmi_group=2' >> /boot/config.txt"
sudo sh -c "echo 'hdmi_mode=82' >> /boot/config.txt"


