This project, part of the Software Engineering course at the Faculty of Informatics, International University of Applied Sciences Bad Honnef - Bonn, is inspired by Brewfather. It aims to develop a web app tailored for home-brewers to efficiently manage brewing processes. Motivated by personal experience as a homebrewer and interest in self-hosting, the creator seeks to provide a self-hosted alternative to subscription-based services like Brewfather. The project will be hosted on a personal server, running within a Docker container, to cater to a specific niche in brewing management.
Explore the docs »
View Demo
·
Report Bug
·
Request Feature
Table of Contents

The project, undertaken as part of the Software Engineering course at the Faculty of Informatics, International University of Applied Sciences Bad Honnef - Bonn, seeks to develop a web application tailored for home-brewers. Inspired by the existing project Brewfather, the objective is to create a platform that assists brewers in efficiently managing their brewing processes. The project is motivated by personal experience, with the creator being a homebrewer looking for a self-hosted solution. By leveraging Docker containers, the aim is to provide a self-hosted alternative to subscription-based services like Brewfather, catering to a specific niche within the brewing community.
The project is built using the following technologies:
| Frontend | Backend | Database | Containerization |
|---|---|---|---|
The project is developed using the following tools:
| IDE | Documentation | Version Control | Operating System |
|---|---|---|---|
This project provides multiple ways to get started. You can either clone the repository and run the project locally or use the provided Docker container to run the project in a containerized environment. The following sections provide detailed instructions on how to get started with the project using the following three methods:
- Local Deployment
- Docker Deployment
- Unraid Deployment (coming soon)
To run the project locally, you need to have the following software installed on your machine:
- Python 3.8 or higher
- Database PostgreSQL
In order to run the application locally, follow the steps below:
Before you start, make sure you have the database set up. You can either use PostgreSQL or SQLite. If you choose to use PostgreSQL, make sure you have it installed on your machine. If you choose to use SQLite, you can skip this step.
Note: The following steps assume you are running locally on a Linux machine. If you are using a different operating system, the steps may vary.
-
Install PostgreSQL on your machine
sudo apt update
sudo apt install postgresql postgresql-contrib
The installation process will create a new user called
postgreswith the rolepostgres. It will also create a new system account with the same name. To use PostgreSQL, you need to log in as thepostgresuser.The HoppyBrew application will create a new database called
hoppybrew_dbupon startup. You can change the database name in the.envfile.Should you chose to remove the database, you can do so by running the following command:
sudo -u postgres psql -c "DROP DATABASE hoppybrew_db"
-
Clone the repository
git clone
-
Navigate to the project directory
cd iu-project-software-engineering -
Create a virtual environment
python3 -m venv .venv
-
Activate the virtual environment
source .venv/bin/activate -
Install the required packages
pip install -r /docker/requirements.txt
-
Run the project
uvicorn main:app --reload
-
Open your browser and navigate to
http://localhost:8000 -
You should see the project running
At this point, you should have the project running locally on your machine. You can now move on to the next steps to set up the database and start using the application.
To stop the project, press Ctrl + C in the terminal.
To run the project using Docker, you need to have the following software installed on your machine:
- Docker
In order to run the application using Docker, follow the steps below:
-
Run postgres database in a docker container
docker run --name hoppybrew-db -e POSTGRES_PASSWORD=postgres -e POSTGRES_USER=postgres -p 5432:5432 -d postgres
Where:
--name hoppybrew-dbspecifies the name of the container-e POSTGRES_PASSWORD=postgresspecifies the password for the database-e POSTGRES_USER=postgresspecifies the username for the database-p 5432:5432specifies the port mapping for the database-d postgresspecifies the image to use for the container- You can change the values for
POSTGRES_PASSWORD,POSTGRES_USER, andPOSTGRES_DBto suit your needs - You can also change the port mapping to a different port if needed
This command will first pull the PostgreSQL image from Docker Hub and then run the container with the specified options.
-
Build the Docker image for the application
docker build -t hoppybrew_image . -
Run the Docker container
docker run -d -p 127.0.0.1:8000:8000\
    --env NAME=HoppyBrew\
    --env DATABASE_HOST=host.docker.internal\
    --env DATABASE_PORT=5455\
    --env DATABASE_NAME=hoppybrew_db\
    --env DATABASE_USER=postgres\
    --env DATABASE_PASSWORD=postgres\
    --name hoppybrew_container hoppybrew_image
Where:
--name hoppybrew_container hoppybrew_imagespecifies the name of the container and the image to use for the container-dspecifies that the container should run in detached mode-p -p 127.0.0.1:8000:8000specifies the port mapping for the container--env NAME=HoppyBrewspecifies the name of the application--env DATABASE_HOST=host.docker.internalspecifies the host for the database container--env DATABASE_PORT=5455specifies the port for the database container--env DATABASE_NAME=hoppybrew_dbspecifies the name of the database--env DATABASE_USER=postgresspecifies the username for the database--env DATABASE_PASSWORD=postgresspecifies the password for the database
-
Open your browser and navigate to http://localhost:8000
-
You should see the project running
At this point, you should have the project running in a Docker container on your machine. You can now move on to the next steps to set up the database and start using the application.
Instead of passing the environment variables as command-line arguments when running the Docker container, you can set the default values in the Dockerfile. This way, you don't have to specify the environment variables every time you run the container.
As it turns out, you can not directly set the environment variables in the Dockerfile. This is because the environment variables are set at runtime, not at build time. However you create some arguments in the Dockerfile and then pass the arguments to the environment variables at runtime. Here's how you can do it:
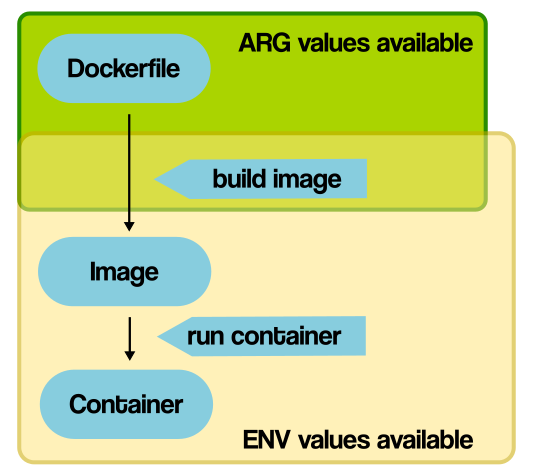
Note: in the image, there is a rectangle around Dockerfile. This is a bit confusing. It should be around the “build image” step only. But that would be harder to read…
# Arguments for the environment variables
ARG NAME=HoppyBrew
ARG DATABASE_HOST=host.docker.internal
ARG DATABASE_PORT=5455
ARG DATABASE_USER=postgres
ARG DATABASE_PASSWORD=postgres

# Environment variables
ENV NAME $NAME
ENV DATABASE_HOST $DATABASE_HOST
ENV DATABASE_PORT $DATABASE_PORT
ENV DATABASE_USER $DATABASE_USER
ENV DATABASE_PASSWORD $DATABASE_PASSWORD
Now you can run the Docker container without specifying all the environment variables:
docker run -d -p 127.0.0.1:8000:8000 --name hoppybrew_container hoppybrew_imageThe benefit with this approach is when you pull the image from Docker, the environment variables are already set with the default values. This is particularly useful when you pull the image to a unraid server, because Unraid is then able to generate a template for the container with the default values.
To run the project using Docker Compose, follow the steps below:
-
Create a
docker-compose.ymlfileversion: '3.8' services: # This will create a PostgreSQL database service based on the official PostgreSQL image. If the image is not available locally, Docker will pull it from Docker Hub. hoppybrew-db: image: postgres environment: POSTGRES_PASSWORD: postgres POSTGRES_USER: postgres POSTGRES_DB: hoppybrew_db ports: - "5455:5432" # This will create an application service based on the Dockerfile in the current directory. hoppybrew-app: build: . environment: NAME: HoppyBrew DATABASE_HOST: hoppybrew-db DATABASE_PORT: 5455 DATABASE_NAME: hoppybrew_db DATABASE_USER: postgres DATABASE_PASSWORD: postgres ports: - "8000:8000"
Where:
hoppybrew-dbis the name of the database servicehoppybrew-appis the name of the application serviceimage: postgresspecifies the image to use for the database servicebuild: .specifies the build context for the application serviceenvironmentspecifies the environment variables for the servicesportsspecifies the port mapping for the services- You can change the values for
POSTGRES_PASSWORD,POSTGRES_USER, andPOSTGRES_DBto suit your needs - You can also change the port mapping to a different port if needed
- You can add additional services to the
docker-compose.ymlfile as needed
-
Run the Docker Compose stack
docker-compose up
This command will first build the Docker image for the application and then run the Docker Compose stack with the specified services.
This error occurs when the port you are trying to use is already in use by another process. To fix this error, you can either stop the process using the port or change the port number in the command.
To change the port number, you can add the --port flag followed by the port number you want to use. For example, to run the project on port 5000, you can use the following command:
uvicorn main:app --reload --port 5000To connect PGAdmin to the PostgreSQL database, follow the steps below:
- Open PGAdmin and click on the
Add New Serverbutton - Enter the connection details:
- Hostname/Address:
localhost - Port:
5432 - Maintenance Database:
hoppybrew - Username:
username - Password:
password
- Hostname/Address:
- Click
Saveto save the connection details - You should now see the new server listed in the left sidebar
To distinguish between the local and docker PostgreSQL databases, you can use different port numbers for the two databases. For example, you can use port 5432 for the local database and port 5455 for the docker database. This way, you can connect to the correct database based on the port number.
Here are some of the most frequently used Docker commands:
docker ps- List all running containersdocker ps -a- List all containers (running and stopped)docker images- List all imagesdocker build -t <image_name> .- Build a Docker imagedocker run -d -p <host_port>:<container_port> <image_name>- Run a Docker container in detached modedocker stop <container_id>- Stop a running containerdocker rm <container_id>- Remove a stopped containerdocker rmi <image_id>- Remove an imagedocker exec -it <container_id> /bin/bash- Start a shell in a running containerdocker logs <container_id>- View the logs of a containerdocker-compose up- Start a Docker Compose stackdocker-compose down- Stop a Docker Compose stackdocker-compose logs- View the logs of a Docker Compose stackdocker-compose ps- List all services in a Docker Compose stackdocker-compose exec <service_name> /bin/bash- Start a shell in a service container
To run the project using Docker, you need to have the following software installed on your machine:
- Docker
This is an example of how to list things you need to use the software and how to install them.
- npm
npm install npm@latest -g
- Get a free API Key at https://example.com
- Clone the repo
git clone https://github.com/asbor/iu-project-software-engineering.git
- Install NPM packages
npm install
- Enter your API in
config.jsconst API_KEY = 'ENTER YOUR API';
Use this space to show useful examples of how a project can be used. Additional screenshots, code examples and demos work well in this space. You may also link to more resources.
For more examples, please refer to the Documentation
- Feature 1
- Feature 2
- Feature 3
- Nested Feature
See the open issues for a full list of proposed features (and known issues).
Contributions are what make the open source community such an amazing place to learn, inspire, and create. Any contributions you make are greatly appreciated.
If you have a suggestion that would make this better, please fork the repo and create a pull request. You can also simply open an issue with the tag "enhancement". Don't forget to give the project a star! Thanks again!
- Fork the Project
- Create your Feature Branch (
git checkout -b feature/AmazingFeature) - Commit your Changes (
git commit -m 'Add some AmazingFeature') - Push to the Branch (
git push origin feature/AmazingFeature) - Open a Pull Request
Distributed under the MIT License. See LICENSE.txt for more information.
Project Link: https://github.com/asbor/iu-project-software-engineering
Test commit