Code for Sparkfun's Arduino Audio Spectrum Shield in the style of a TNG Okudagram.
Written using Arduino IDE v1.0.5 and Processing v2.0.3 on Nov 3rd, 2013.
- Get a Spectrum Shield from Sparkfun as well as an Arduino Uno, plug the former into the latter.
- Download the files.
- Install the Arduino code onto the Uno. Leave the Uno connected to the computer.
- Plug an audio source (mp3 player, laptop, phone) into the shield's left plug. Set the source's volume to high.
- Connect the shield's right plug to headphones or amplifier, prefably with volume control.
- Open the Processing code and, if neccesary, change line 30 to the order number of the COM port your Uno appears on
(myPort = new Serial(this, Serial.list()[1], 115200);)
For example, when I plug in my Uno it shows up on COM5, but it is the second COM port in use so I enter "1" on line 30 of the code. Why "1" for the second COM port instead of "2"? Because the computer starts counting at 0! This number will vary depending on the amount of devices connected to your computer that are using ports. - Run the Processing code and the LCARS will open and immediately display a visualization of the sound being received by the shield.
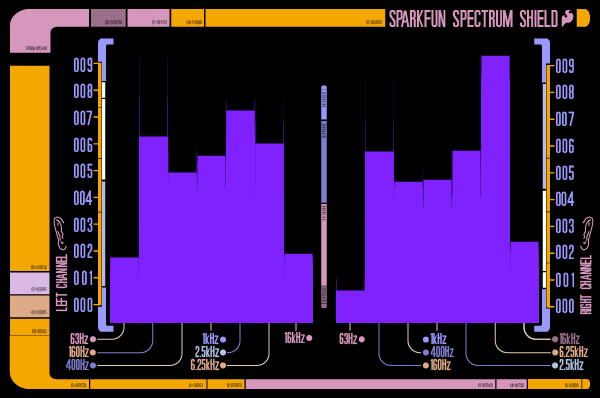
The Sparkfun Spectrum Shield uses two MSGEQ7 graphic equalizer display filter ICs to sample the audio input, one IC for the left channel and another for the right. This IC takes seven samples of the input at different frequencies and outputs a proportional amount of DC voltage via multiplexing. ( Tronixstuff.com explains this in a far saner fashion than I: http://tronixstuff.com/2013/01/31/tutorial-arduino-and-the-msgeq7-spectrum-analyzer/)
The Arduino Uno analogReads the DC voltage of each of the fourteen samples (there are two ICs with seven bands each). These values are then mapped and sent to the computer. Processing reads these values and uses them to draw lines representing each of the frequency bands for both channels. These lines are drawn on top of a static, PNG background which was created with Adobe Illustrator.