The following project is dedicated to the construction of a mobile particulate matter sensor. Using a mobile hotspot from your smartphone and a built-in GPS sensor, the sensor can be used outdoors. If a box is built, this can even be attached to the bike and measure the particulate matter while driving. The data can optionally be published to opensensemap or thingsboard. Apart from the setup of the Raspberry Pi, you do not need a lot of computer knowledge and you do not have to code anything, just adapt the config.py file to your liking.
< ----- IMAGE OF SETUP ----- >
- RaspberryPi Zero W
- SDS011-PM Sensor
- Neo6mGPS-Sensor
- You may need a soldering station if the GPS sensor comes without soldered pins
- 4 female-to-female Jumper Cables
- Micro Usb Cable (to power RaspberryPi)
- PowerBank (optional)
- Smartphone with MobileHotspot (optional)
Follow this Guide to setup your pi: https://cdn-learn.adafruit.com/downloads/pdf/raspberry-pi-zero-creation.pdf
WIFI
Note: To let your pi publish via smartphone hotspot, also add your hotspot wifi-settings to wpa_supplicant.conf file. Change ssid and psk and place this file in boot folder of pi's sd-card:
country=DE
ctrl_interface=DIR=/var/run/wpa_supplicant GROUP=netdev
update_config=1
network={
     ssid="your_home_wifi_ssid"
     scan_ssid=1
     psk="wifi-password"
     key_mgmt=WPA-PSK
}
network={
     ssid="your_mobile_hotspot_ssid"
     scan_ssid=1
     psk="mobile-hotpost-password"
     key_mgmt=WPA-PSK
}
SSH
after setting up your pi by the above-mentioned the guide, connect to your pi via ssh:
$ ssh [email protected]
optional:
Force pi from accepting the LANG variable sent by my computer via ssh (was necessary when using a mac):
$ sudo nano /etc/ssh/sshd_config
- comment out
AcceptEnv LANG LC_with a # - save and exit nano (remember this for later):
- CTRL+O & enter to save file
- CTRL+X to exit
change hostname
$ sudo nano /etc/hostname
- change 'raspberrypi' to your desired hostname and safe file
$ sudo nano /etc/hosts
- change 'raspberrypi' to your desired hostname and save file
$ sudo reboot
after setting up your new hostname you can access your pi with:
$ ssh pi@<your-host-name>.local
Connect the SDS011-PM sensor with the USB cable and the micro USB adapter to your Raspberry Pi (do not use the micro USB input for the power connection)
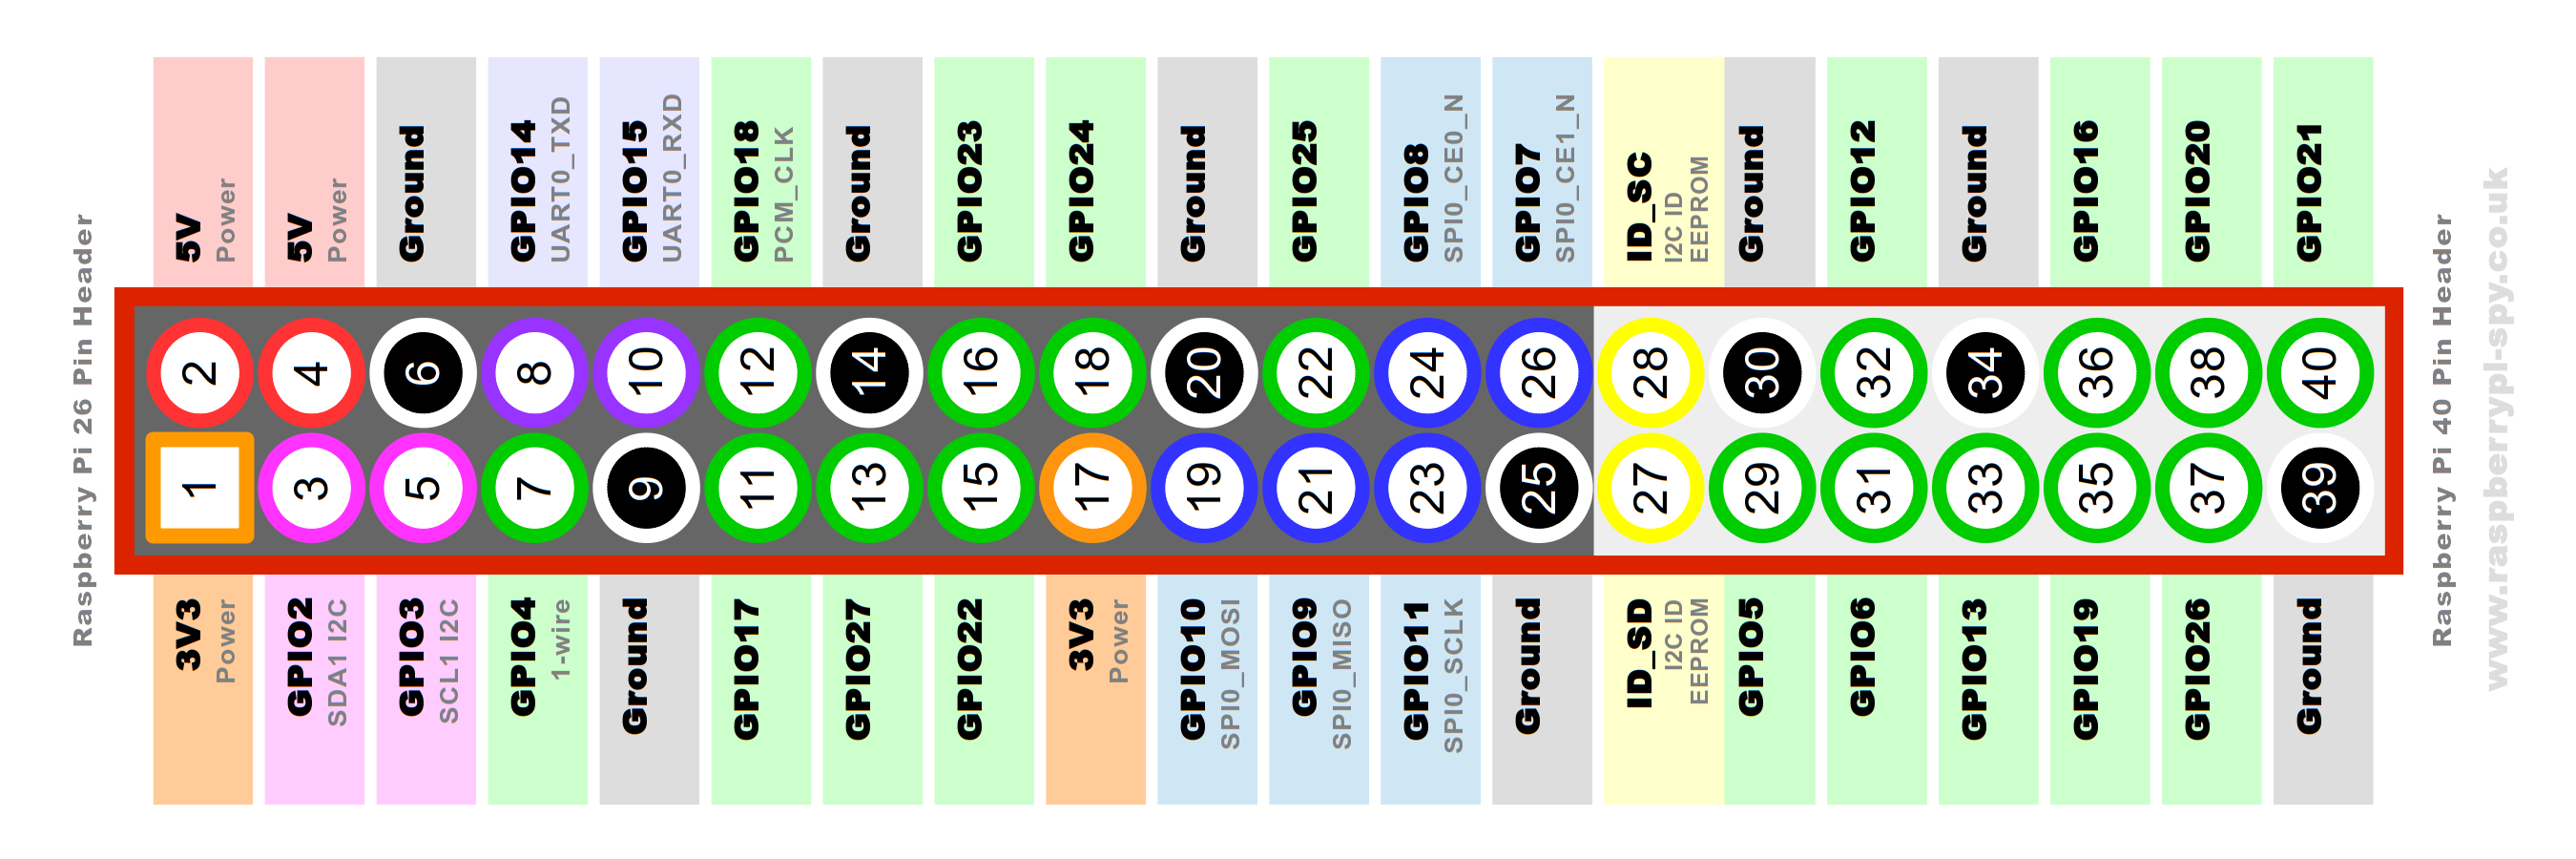
It may be that your GPS sensor comes without soldered pins. You have to carefully solder these before. Connect the GPS sensor to the female-to-female jumper cables with your Raspberry Pi:
| GPS-Sensor Pin | Raspberry Pi Pins |
|---|---|
| VCC | Pin 1 |
| GND | PIN 6 |
| TXD | Pin 10 |
| RXD | Pin 8 |
< Images of setup >
$ sudo apt-get install git python3-pip minicom gpsd gpsd-clients
$ sudo pip3 install paho-mqtt requests pyserial pynmea2 gpsd-py3
edit /boot/config.txt:
$ sudo nano /boot/config.txt
At the bottom of the file add following lines and save file:
# Enable UART
dtoverlay=pi3-disable-bt
core_freq=250
enable_uart=1
force_turbo=1
edit cmdline.txt: make a copy of cmdline.txt file
$ sudo cp /boot/cmdline.txt /boot/cmdline.txt.backup
Edit cmdline.txt file:
$ sudo nano /boot/cmdline.txt
- Remove
console=serial0,115200and modifyroot=/dev/mmcblk0p2so that the file will probably look like this:
dwc_otg.lpm_enable=0 console=tty1 root=/dev/mmcblk0p2 rootfstype=ext4 elevator=deadline fsck.repair=yes rootwait
- save the file
$ sudo reboot
Stop and disable the Pi’s serial ttyS0 service
$ sudo systemctl stop [email protected]
$ sudo systemctl disable [email protected]
following commands will enable it again if needed:
$ sudo systemctl enable [email protected]
$ sudo systemctl start [email protected]
reboot:
$ sudo reboot
enable ttyAMA0 service (the one for the gps-sensor):
$ sudo systemctl enable [email protected]
- Configure the module for the 9600 rate:
stty -F /dev/ttyAMA0 9600
- Connect AMA0 to the GPS Software, but first kill the process and add the device to gpsd tool
- gpsd is a daemon which buffers the gps data from the Neo6m-sensor
sudo killall gpsd
sudo nano /etc/default/gpsd
- Edit the file /etc/default/gpsd and add your serial port in DEVICES, like
DEVICES="/dev/ttyAMA0"
- enable gpsd to start at boot:
sudo systemctl enable gpsd.socket
sudo systemctl start gpsd.socket
reboot:
$ sudo reboot
test your gps sensor: Note that the antenna should have a good view of the open sky. It may take some time before plausible coordinates appear for the first time
$ cgps -s
- Clone this repository on your pi.
- Setup your configurations in config.py
- Add Thingsboard and OpenSenseMap Tokens
- Adjust measure and publishing time intervals
- you can disable/enable publishing to thingsboard or OpenSenseMap if you want
- cd into the repository and run:
$ sudo python3 measure.py
- This will start the measuring and will by default measure every 2 seconds and publish data every 15 seconds to thingsboard and opensensemap.
Cronjob for autostart at boot:
- get your python installation path
$ which python3- mostly
/usr/bin/python3
- mostly
- If you want to run the script automatically on reboot setup a cronjob.
$ sudo crontab -e
- select nano as editor by pressing 2
- add following:
@reboot /usr/bin/python3 < PATH_TO_THE_FILE >measure.py &
- and then
sudo reboot
Start Measuring
- Turn on mobile hotspot of your smartphone
- boot your pi
- measuring will autostart and publish data
- create Thingsboard dashboard and make it public
- Tuturial for OpenSenseMap Sensor Setup and Thingsboard Setup with dashboard import
- Dockerize all of this to really just plug n play
- Make a Poster
- https://cdn-learn.adafruit.com/downloads/pdf/raspberry-pi-zero-creation.pdf
- Guide for setting up RaspberryPi Zero W
- https://github.com/ikalchev/py-sds011
- Python Interface for the SDS011-Sensor
- https://drive.google.com/file/d/1GZhScPfuZLRcAfO3AVqQ8iFY1jaGVR2E/view
- Nice Guide for setting up Neo6mGPS-Sensor
- https://github.com/MartijnBraam/gpsd-py3
- Python3 GPSD client to get gps data
- https://github.com/FranzTscharf/Python-NEO-6M-GPS-Raspberry-Pi
- Inspiration for Neo6m setup
turn off pi via ssh
$ sudo shutdown -h now
