-
Notifications
You must be signed in to change notification settings - Fork 0
Getting Started
Please read this page in full before you do anything else!
- Introduction
- The WSL-ROS Environment
- Configuring Visual Studio Code
- The WSL-ROS Environment Part 2 (other things to be aware of)
MiRo Developer Kit (MDK) is a ROS-based software package that includes everything required for working with a MiRo robot, either simulated or physical. MDK requires a specific version of the Robot Operating System (ROS) — the middleware layer that powers the robot. Throughout this course you will be working with the most up-to-date version of ROS1: ROS Noetic Ninjemys (or "ROS Noetic" for short). Every version of ROS is tied to a particular version of the Ubuntu Operating System. While it's possible to run ROS on other operating systems (including Windows), we have opted for Ubuntu for stability, reliability and ease! ROS Noetic runs on Ubuntu 20.04 (Focal Fossa).
When working with MiRo and MDK it is useful to define three 'profiles', which describe different ecosystems.
These three profiles are 'on-board', 'off-board', and 'simulator'.
The 'simulator' profile refers to working in simulation without the use of a physical robot; while 'on-board' and 'off-board' refer to the way the software is used to control the robot, which can either run 'on-board' the robot, or run 'off-board' on your workstation, communicating with the robot over Wi-Fi.
Software written for one profile is suitable for use with the others, and what you learn working in one profile will be applicable to the others.
A small number of caveats regarding compatibility and profile limitations are described below, along with the pluses and minuses of each approach.
The 'simulator' profile is the simplest to start since it doesn't require a physical robot, and this is what you will use in the first lab session. For this course we have created a custom ROS and Ubuntu 20.04 environment which runs as a virtual machine on Windows, using the Windows Subsystem for Linux (WSL). Throughout this Wiki we refer to this as the "WSL-ROS Environment" or "WSL-ROS". WSL-ROS is installed on all of the University of Sheffield Managed Desktop Computers located in Computer Rooms 1, 2, 3 & 4 of the Diamond. You can also access this on remote-access machines in Virtual Classroom 1. See the "Accessing the Environment Remotely" Section below for more details on this.
However, with all the perks there is a downside — a lack of graphical accelerator available to the virtual machine. This means that Gazebo graphical simulator is forced to run on the CPU, which results in suboptimal performance and relatively low FPS.
Note: It is also possible to work in simulation on the Diamond laptops. The upside of this approach is increased performance, as NVIDIA GPU is used instead to render Gazebo. This will be covered in the future session.
Off-board profile is when you develop the code on a laptop or workstation and then use a remote connection to control the robot from that device. Unfortunately, due to University network settings at the moment it is not possible to control the robots via the CR3 workstations running WSL-ROS. To overcome this, for the off-board profile we have prepared exactly the same OS/Software as the WSL-ROS environment, i.e. Ubuntu 20.04 and ROS Noetic on the dedicated Diamond laptops that we have in the robotics lab.
On the laptops there is a 'student' user account that you should use when working in the lab. The laptop should log you into this user account automatically on startup, but we will provide you with the account password as well, during the lab sessions, should you need it. The laptops, along with more detailed instructions will be given out in the second lab session.
On-board profile refers to the way of controlling the robot when a user establishes a remote connection with the robot (e.g. via SSH) and all the ROS nodes and the rest of ROS infrastructure are run on the robot.
Note: MiRo's 'brain' (Raspberry Pi 3B+) still runs on an older Raspbian version (akin to Ubuntu 16.04) and has and older ROS version — Kinetic Kame. This version of ROS has limited support for Python 3, which is important to remember when running the code 'on-board'.
| Profile | Characteristics |
|---|---|
| On-board | No reliance on the network once controller is running, can be useful for multiple robots or field robotics. Control is at low latency and with no bandwidth concerns. Development cycle is slower and compile-times, if using, are long. Overall compute power is limited. |
| Off-board | Requires network at run-time, which can introduce variable latency and limited bandwidth. Development is convenient and rapid and compiling is fast. Compute power can be scaled. |
| Simulator | No requirement for physical robot, so no effort on maintenance and repair. Imperfect match with the real world, some faculties missing. Compute power can be scaled, sub-real-time can be used to scale also. |
The simulated robot lacks some of the faculties of the physical robot: at the time of writing, touch and audio sensors, audio output, and illumination output are not implemented.
As discussed previously, you will start your work in simulation using the WSL-ROS environment. This is available on the University Computers in The Diamond, Computer Rooms 1, 2, 3 and 4; as well as the remote-access machines in Virtual Classroom 1 available via the University Remote Desktop Service.
Note: Please make sure to read carefully the next chapter as there are some changes and improvements to the WSL-ROS since last year's COM2009 labs.
Each time you launch WSL-ROS on an applicable University Machine the WSL-ROS environment will be installed from a custom OS image that we have created, which contains the Ubuntu 20.04 operating system, ROS and MDK packages that you will need for this lab course. The environment that you install will only remain on the machine that you install it on for a limited time, and will also not be preserved across different computers that you may log into. It is therefore essential that you back up your work every time you use the WSL-ROS environment.
Click the Windows Start Menu button  , start typing
 "wsl-ros" and click on the application shortcut that should then appear in the list:

You will be presented with the following screen:

WSL-ROS is now being installed from the custom OS image, which may take a couple of minutes to complete. Once it's done, the Windows Terminal should automatically launch:
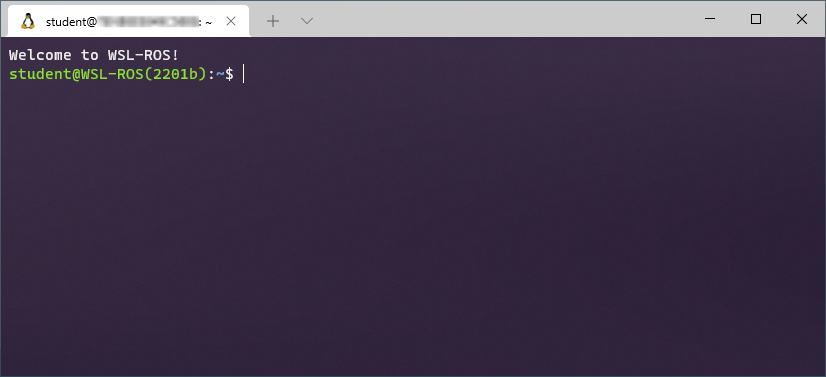
The tab that is opened when the Windows Terminal app launches is an Ubuntu Terminal Instance, giving us access to the Ubuntu 20.04 operating system that we have just installed. This is the WSL-ROS Environment that we have created for this lab course.
It is important to note that the default ROS settings applied to the environment are those for Turtlebot3, since the WSL-ROS environment is also used for COM2009 labs.
We have prepared a few helpers scripts that would automatically change the settings between TB3s and MiRos, without the need for a user to manually change anything in the ~/.bashrc.
To switch to the MiRo profile, simply type $ robot_switch miro in the terminal.
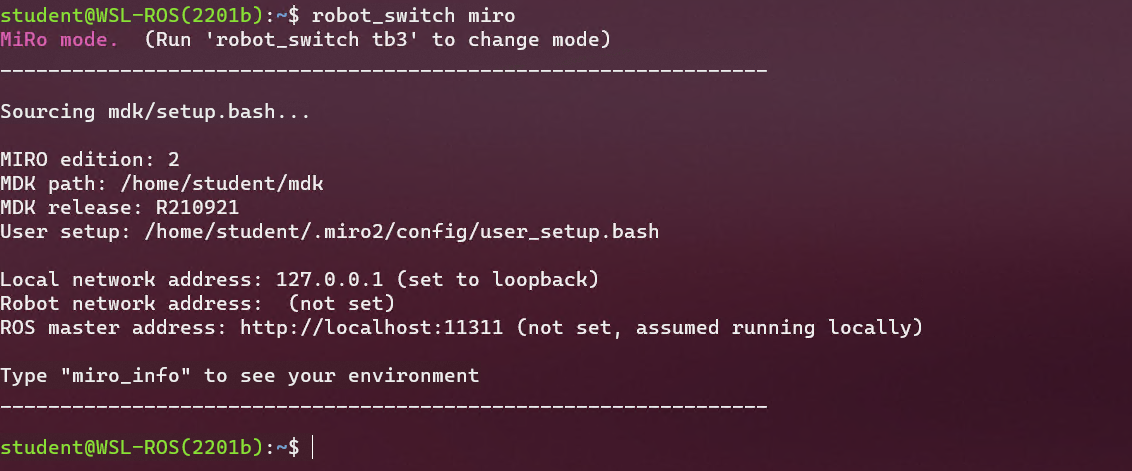
If you have any other terminal windows open make sure to either restart them or re-source the profile by using an alias $ src, which is shorthand for source ~/.bashrc to apply the latest settings.
It is very easy to distinguish which profile is being used at the moment by opening a new terminal window: the TB3 profile will simply show a prompt, while the MiRo profile will show an info screen with all the current settings.
You are all set up and ready to go!
Visual Studio Code (or 'VS Code', for short) should be installed on all of the University of Sheffield Managed Desktop Computers in the Diamond Computer Rooms. This is a great Integrated Development Environment (IDE) that we will rely on quite a lot for this course. We need to make sure it's set up correctly to begin with though, so follow the steps below now to install the "Remote - WSL" VS Code extension, in preparation for later.
Note: You should only ever need to do this bit once: the configurations should be saved to your user profile, and should be carried over to any University Desktop Machine that you log into!
-
Click the Windows Start Menu button
 , type
 "vscode"and the Visual Studio Code application shortcut should then appear in the list:
Click on it to launch the application.
-
In the left-hand toolbar click the "Extensions" icon (or use the
Ctrl+Shift+Xkeyboard shortcut):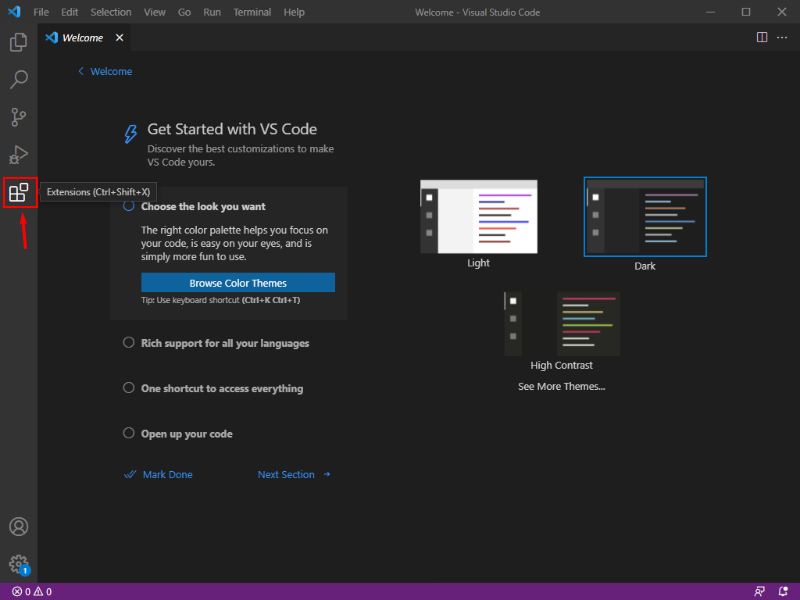
-
In the search bar (where is says "Search Extensions in Marketplace") type
"remote", find the "Remote - WSL" extension in the list and then click the blue "Install" button next to it: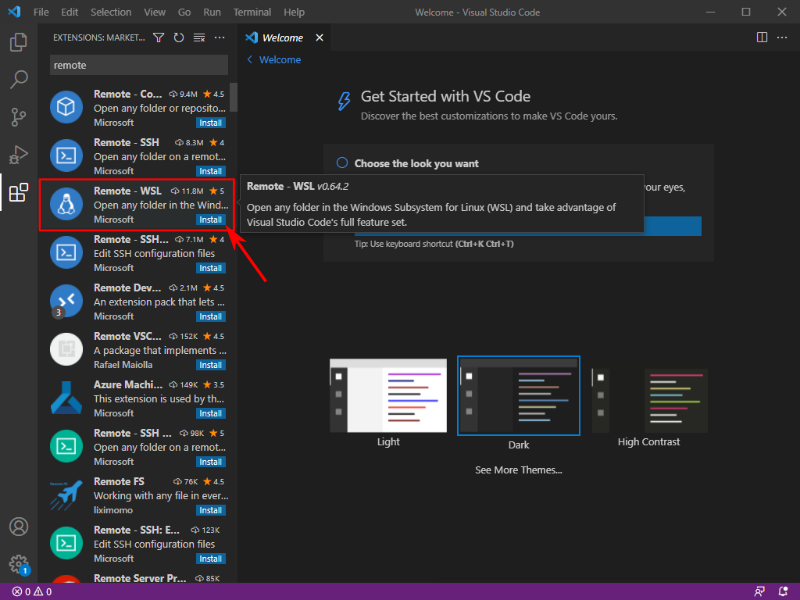
Once installed, you should see a page similar to the one below:
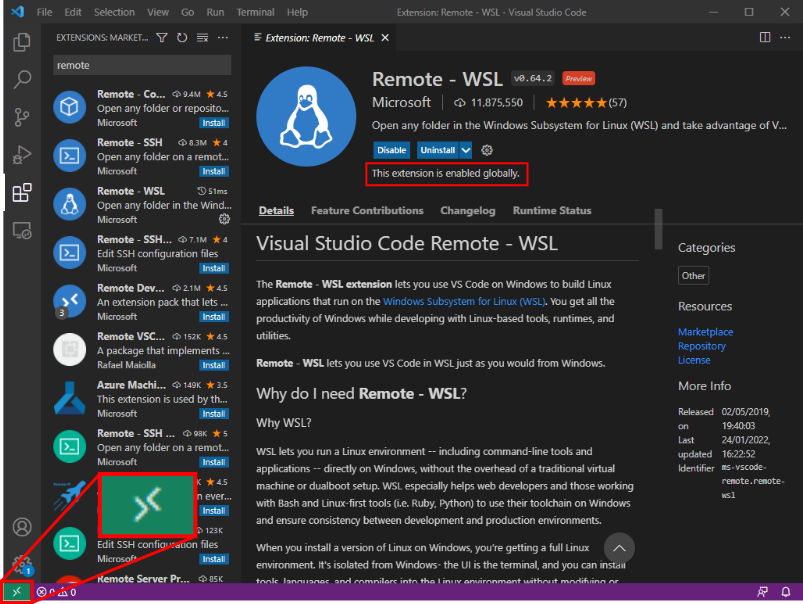
On this page, it should state that "This extension is enabled globally" (as shown in red), and you should also see a green icon with two arrows in the bottom left-hand corner of the application window.
-
You can close down VS Code now, we'll launch it again when we need it.
As discussed above, the WSL-ROS Environment that you created in the above step will only be preserved for a limited time on the machine that you installed it on! In general, any work that you do within this environment will not be preserved between sessions or across different University machines automatically. You will therefore have to re-install the environment at the beginning of each practical session, or whenever else you need to work with it. You must therefore make sure that you follow the steps below to backup your work to your University U: Drive every time you finish working in the environment, so that you can then restore it the next time you return (we'll remind you about this at the start and end of every practical session too).
The WSL-ROS Environment will be preserved for a limited time if you happen to login to the same University machine within a few hours. If this is the case, then (on launching WSL-ROS) you will be presented with the following message:

Enter Y to continue where you left things previously, or N to start from a fresh installation.
Note: If you select
Nthen any work that you have created in the existing environment will be deleted! Always make sure you backup your work using the procedure outlined below!
Note: It can happen that you still have an old COM2009 backup on your U: drive. This shouldn't be an issue, as the file naming convention has changed and the old backup file is not being used by the new backup mechanism.
Every time you do any work in the WSL-ROS Environment it's really important that you run a backup script before you close it down and log out of the University Machine that you are working on. To do so is very easy, simply run the command below from any WSL-ROS Terminal Instance:
wsl_ros backup
This will create an archive of your Linux Home Directory and save it to your University U: Drive. Remember, that your work will not be preserved within the WSL-ROS Environment between sessions (unless you happen to log back in to the same computer again within a couple of hours). As such, whenever you launch a fresh WSL-ROS Environment again, simply run the following command to restore your work to it:
wsl_ros restore
To make things a little easier, when you launch a fresh WSL-ROS Environment the system will check to see if a backup file already exists from a previous session. If it does, then the system will ask you if you want to restore it straight away:

Enter Y to restore your data from your backup file, or N to leave the backup file alone and work from fresh (where none of your previous work will be available in the environment).
The WSL-ROS environment is also available remotely on some University machines via the University Remote Desktop Service.
Note: You will need to use your university account credentials to access this service and will also need to have multi-factor authentication (MFA) set up on your account. See here for more information on how to set up MFA on your University Account.
- The environment has been installed on all the machines in Virtual Classroom 1, which can be accessed here (University of Sheffield sign-in required).
- From here, you should see a long list of PCs. Any that have a blue "Connect" button next to them are available to use.
- Click on the "Connect" button next to an available machine. This will download a
.rdpfile to your computer. - Once downloaded, double click on the
.rdpfile and log in to the PC using your university account credentials. Look out for an MFA notification on your MFA-linked device. - Once you are logged into the remote machine follow the steps in the Launching WSL Section to launch the WSL-ROS environment.
- When you are finished, close the RDP connection and then close the Remote Desktop app on your own machine.
Note: Only the computers in Virtual Classroom 1 have the WSL-ROS environment installed, so make sure you only use this room if you want to work on this remotely.
Note: At the moment, some of the machines in the VC1 pool are still pending a reboot to complete installation process. If your WSL-ROS instance keeps crashing, check whether Windows Terminal is installed on that machine. If not, you will have to reboot the virtual machine from inside and update the software centre once reconnected.
Note: We (the COM3528 Teaching Team) are not able to deal with issues relating to the University Remote Desktop Service!
If you are facing any issues then you should have a look at this IT Services support page. You can also contact the IT Services Helpdesk for help and support (Monday-Friday between 8am-5pm).
If you are having issues related to WSL-ROS however, then please let us know.
We will use the Windows Terminal to interact with Ubuntu and ROS for this lab course, and we have created a custom settings file to configure this appropriately for the WSL-ROS Environment. If you have used the Windows Terminal before on a University Machine, or if you have used the WSL-ROS environment previously and have modified the settings file that we have provided, then you will be presented with the following prompt:
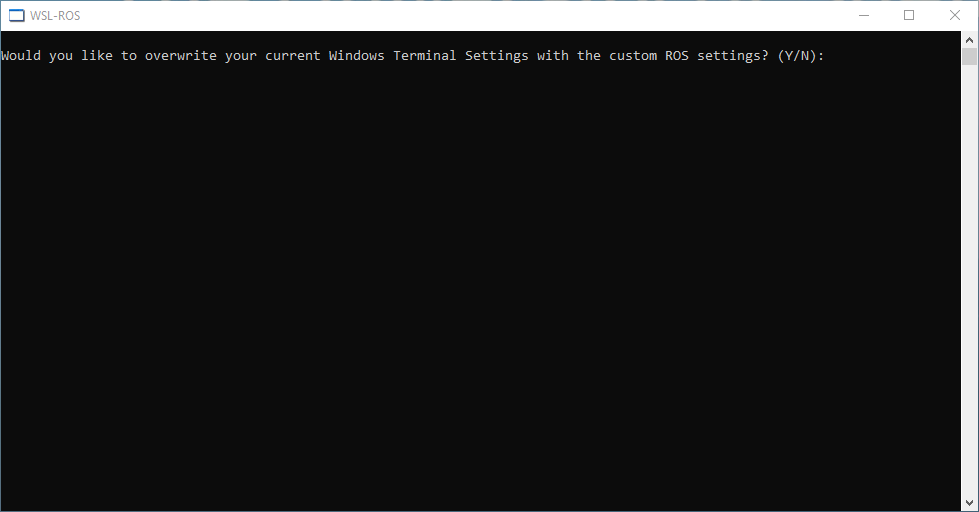
Enter Y to use the settings file that we have provided and overwrite whatever was there previously (we recommend this, but be aware that any existing Windows Terminal settings that you may have configured previously will be deleted).
Alternatively, enter N to preserve your own settings, but note that your experience will then differ to that presented throughout this Wiki and some of the instructions may no longer work in the same way.
You are all good to go now! Head on over to the Week 1 Page now to get started on this lab course!
Navigating This Wiki:
← Welcome |
Week 1: Overview of the MDK →
COM3528 Cognitive and Biomimetic Robotics
Academic Year 2021–2022
Alex Lucas | Department of Computer Science | The University of Sheffield
(Last updated: 24/03/2022)
The documentation within this Wiki is licensed under Creative Commons License CC BY-NC:
You are free to distribute, remix, adapt, and build upon this work (for non-commercial purposes only) as long as credit is given to the original author.