!pip install --upgrade transformersThe encoder-decoder architecture is a general architecture for learning sequence-to-sequence problems. It is used extensively in NLP, originally for machine learning tasks (NMT). It is then adopted for other tasks, for example, document summarization, question answering, etc.
With the success of the Transformer architecture and Transfer learning paradigm, the de-facto standard method nowadays for NLP tasks is to fine-tune a pretrained Transformer model on a downstream mask. This usually produces descent results within a few hours of training. Well known examples are BERT and GPT models. When it comes to sequence-to-sequence problems, there are 2 ways to combine the transformer-based encoder-decoder architecture with Transfer learning paradigm:
- Initialize an encoder-decoder model, pre-train it with different sequence-to-sequence objectives, then fine-tune it on downstream tasks. BART and T5 models are 2 examples of this approach.
- Take pretrained encoder and decoder models - which are pretrained with their own pretraining objectives, usaully being MLM (masked language modeling) and CLM (causal language modeling) respectively. Then combine them into an encoder-decoder model and fine-tune it. See Rothe et al. (2019).
Since BERT and GPT were introduced, there are a series of transformer-based auto-encoding and auto-regressive models being developed, usually with differences in pretraining methods and attention mechanisms (to deal with long documents). Furthermore, several variations have been used to pretrain on datasets in other languages (CamemBERT, XLM-RoBERTa, etc.), or to produce smaller models (for example, DistilBERT).
The approach in Rothe et al. (2019) allows us to combine different encoders and decoders from this ever-growing set of pretrained models. It is particular useful for machine translation - we can take an encoder in one language and a decoder in another language. This avoids to train each combination of language paris from scratch: sometimes we have little translation data for a low-resource language, while still having adequate mono-lingual data in that language.
While the transformer-based encoder-decoder architecture dominates NLP conditional sequence generation tasks, it was not used for image-to-text generation tasks, like text recognition and image captioning. The pure transformer-based vision encoder introduced in Vision Tranformer in 2020 opens the door to use the same encoder-decoder architecture for image-to-text tasks, among which TrOCR is one example, which leverages pre-trained image Transformer encoder and text Transformer decoder models, similar to Rothe et al. (2019) for text-to-text tasks.
In this post, we will give a short introduction to the encoder-decoder architecture along its history. We then expalin how the Vision Transformer works and its difference from the original Transformer. We provide a visualization of the vision-encoder-decoder architecture to better understand it. Finally, we show how to train an image-captioning model by using 🤗 VisionEncoderDecoderModel implementation with an example training script, and provide a few tips of using it.
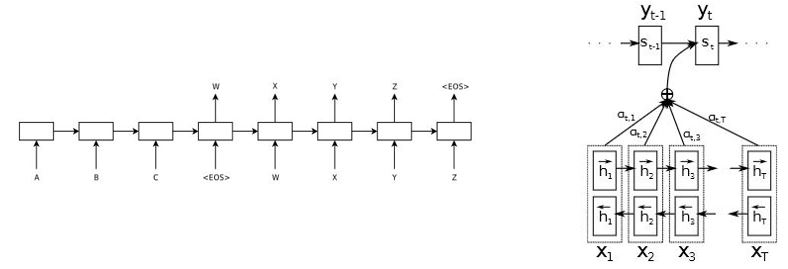
The encoder-decoder architecture was proposed in 2014, when several papers (Cho et al., Sutskever et al., Bahdanau et al., etc.) used it to tackle the machine translation tasks (NMT, neurla machine translation). At this time, the encoder-decoder architecutre was mainly based on recurrent neural networks (RNN or LSTM), and its combination with different variations of attention mechanisms dominate the domain of NMT for almost about 3 years.
 |
|---|
| Figure 1: RNN-based encoder-decoder architecture [1] [2] Left: without attention mechanism | Right: with attention mechism |
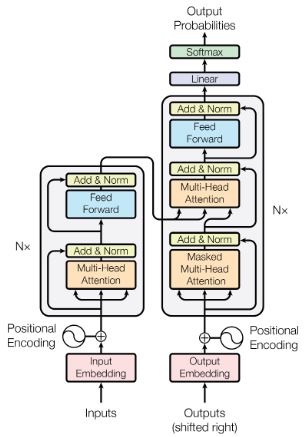
In 2017, Vaswani et al. published a paper Attention is all you need which introduced a new model architecture called Transformer. It still consists of an encoder and a decoder, however instead of using RNN/LSTM for the components, they use multi-head self-attention as the building blocks. This innovate attention mechanism becomes the fundamental of the breakthroughs in NLP since then, beyond the NMT tasks.
 |
|---|
| Figure 2: Transformer encoder-decoder architecture [3] |
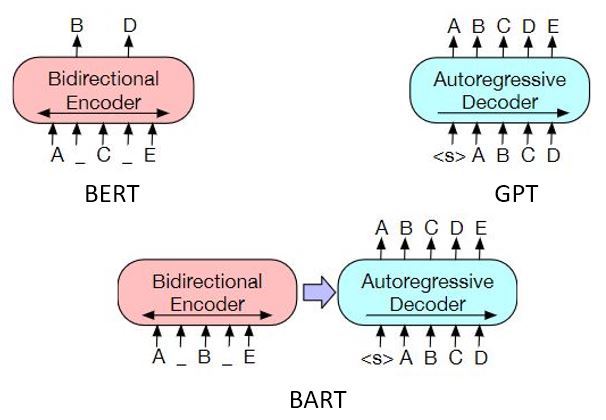
Combined with the idea of pretraining and transfer learning (for example, from ULMFiT), a golden age of NLP started in 2018-2019 with the release of OpenAI's GPT and GPT-2 models and Google's BERT model. It's now common to call them Transformer models, however they are not encoder-decoder architecture as the original Transformer: BERT is encoder-only (originally for text classification) and GPT models are decoder-only (for text auto-completion).
The above models and their variations focus on pretraining either the encoder or the decoder only. The BART model is one example of a standalone encoder-decoder Transformer model adopting sequence-to-sequence pretraining method, which can be used for document summarization, question answering and machine translation tasks directly.1 The T5 model converts all text-based NLP problems into a text-to-text format, and use the Transformer encoder-decoder to tackle all of them. During pretraining, these models are trained from scratch: their encoder and decoder models are initialized with random weights.
In 2020, the paper Leveraging Pre-trained Checkpoints for Sequence Generation Tasks studied the effectiveness of initializing sequence-to-sequence models with pretrained encoder/decoder checkpoints for sequence generation tasks. It obtained new state-of-the-art results on machine translation, text summarization, etc.
Following this idea, 🤗 transformers implements EncoderDecoderModel that allows users to easily combine almost any 🤗 pretrained encoder (Bert, Robert, etc.) with a 🤗 pretrained decoder (GPT models, decoder from Bart or T5, etc.) to perform fine-tuning on downstream tasks. Instantiate a EncoderDecoderModel is super easy, and finetune it on a sequence-to-sequence task usually obtains descent results in just a few hours on Google Cloud TPU.
Here is an example of creating an encoder-decoder model with BERT as encoder and GPT2 and decoder - just in 1 line!
1 It can be used for text classification and generation too, by using only its encoder and decoder respectively.
from transformers import AutoTokenizer, EncoderDecoderModel

# Initialize a bert-to-gpt2 model from pretrained BERT & GPT2 models.
# The cross-attention layers will be randomly initialized.
model = EncoderDecoderModel.from_encoder_decoder_pretrained("bert-base-uncased", "gpt2")
tokenizer = AutoTokenizer.from_pretrained("bert-base-uncased")
Let's take an example from the CNN / DailyMail Dataset and check what the model gives as the output.
article = \
"""
(CNN)A fiery sunset greeted people in Washington Sunday. The deep reddish color caught Seattle native Tim Durkan's eye.
He photographed a handful of aerial shots of the sunset warming the city's skyline and shared them on CNN iReport. The
stunning sunsets were the result of raging wildfires in parts of Siberia. "The dramatic sunsets began showing up over
the weekend and had Seattle locals wondering where the amber-colored haze was originating from," Durken said. The fires
were started in southeastern Siberia, by farmers burning grass in their fields. But on April 14, it is believed that the
flames quickly grew out of control because of strong winds and spread throughout the region, according to CNN affiliate
KOMO-TV. As a result, the fires have destroyed dozens of villages in the region. Rescue crews were able to put out the
flames. However, the lingering smoke from the widespread fires were picked up by atmospheric winds. The winds carried
the smoke from Siberia across the Pacific Ocean and brought it to the Pacific Northwest. Parts of Oregon, Washington and
British Columbia are seeing the results of the smoke, wind and solar light combination. The reason people are seeing an
intense red sunset is a result of smoke particles filtering out the shorter wavelength colors from the sunlight like
greens, blues, yellows and purples, KOMO-TV said. That means colors like red and orange are able to penetrate the air
unfiltered. The colors are especially intense during sunrises and sunsets because there is more atmosphere for the light
to travel through to get to a person's eye. As the smoke starts to dissipate, air quality will get better and these
fiery sunsets will lose their reddish hue.
"""

# replace "\n" by a space.
article = article.strip().replace("\n", " ")

# This is the summary provided in the dataset.
highlights = \
"""
Smoke from massive fires in Siberia created fiery sunsets in the Pacific Northwest .
Atmospheric winds carried smoke from the wildfires across the Pacific Ocean .
Smoke particles altered wavelengths from the sun, creating a more intense color .
""".strip()
input_ids = tokenizer(article, return_tensors="pt").input_ids
output_ids = model.generate(input_ids)
print("predicted summary:")
print(tokenizer.decode(output_ids[0], skip_special_tokens=True))predicted summary:
[unused193] [unused459] [unused466] [unused12] [unused49] [unused12] star [unused281] gate [unused463] zero [unused252] encounter > [unused257] つ [unused321] teasing [unused257]
Our model is talking gibberish 😕. This is because, when loading an encoder-decoder model, the weights in the cross attention layers will be randomly initialized (if the original pretrained decoder doesn't have the cross attention layers yet).
Let's try a model finetuned on the CNN / DailyMail Dataset dataset:
finetuned_model = EncoderDecoderModel.from_pretrained("patrickvonplaten/bert2bert-cnn_dailymail-fp16")
output_ids = finetuned_model.generate(input_ids)print("predicted summary:")
print(tokenizer.decode(output_ids[0], skip_special_tokens=True))predicted summary:
the red sunsets were the result of wildfires in siberia. the fires were started by farmers burning grass in their fields. the fire is believed to have spread out of control because of strong winds. the blazes have destroyed dozens of villages in the region. the red and orange fires are the result from wildfires.
The result looks much better - it is a good summary of the input text!
Now, let's have a look at computer vision transformers before diving into the vision-text encoder-decoder architecture.
1 It can be used for text classification and generation too, by using only its encoder and decoder respectively.
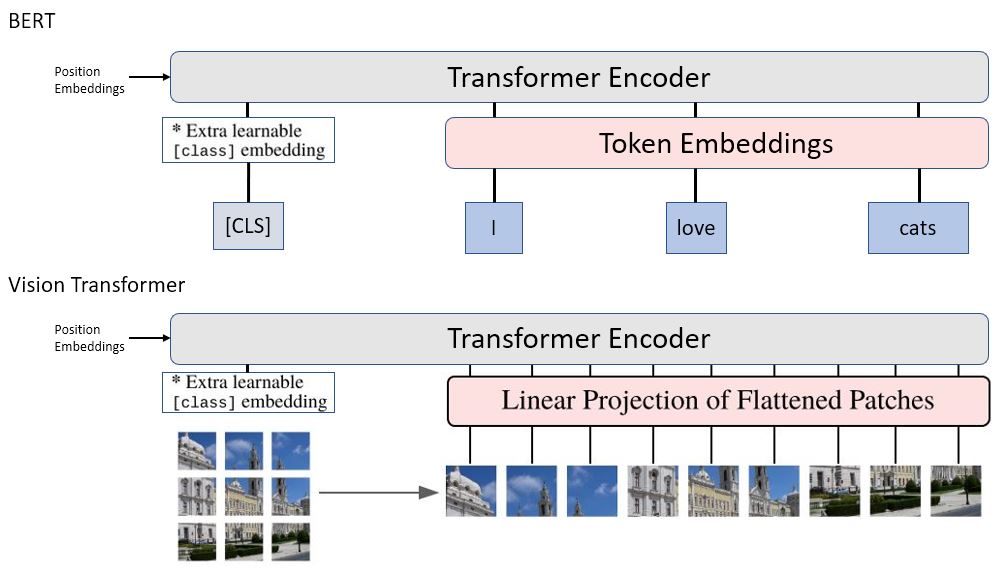
The ViT (Vision Transformer) model, introduced in the paper An Image is Worth 16x16 Words: Transformers for Image Recognition at Scale, applies the vanilla Transformer architecture to medium-resolution images. It is pretrained on large scale datasets and beats the state of the art on multiple image recognization benchmarks around 2020.
Figure 4 shows the difference between ViT and BERT. In fact, they use the same Transformer encoder architecture to encode the input vectors. The only difference is on how they transform the raw inputs that are fed into these two models. While we use token/word embeddings for text data in NLP problems, ViT extracts patches from an image and arranges them as a sequence. Each 2D patch is then flattened into a 1D vector2 and projected to a space of fixed dimension. The obtained sequence of vectors plays the same role as token embeddings in BERT, and after being combined with position embeddings, it is fed to the Transformer encoder.
2 This is just the concept. The actual implementation uses convolution layers to perform this computation efficiently.
Let's play with the Vision Transformer a bit 🖼️!
Here we load a pretrained ViT model (in TensorFlow) by using an auto model class for image classification. We use its TensorFlow version TFAutoModelForImageClassification to demonstrate how you can use 🤗 transformers' TensorFlow models when a checkpoint is only available in PyTorch (by specifying from_pt=True in the method from_pretrained). The model we choose is a cat v.s dog image classification model on top of the pretrained ViT model.
The feature_extractor object is used for image preprocessing, for example, to resize an image and normalize the pixel values.
from transformers import AutoFeatureExtractor, TFAutoModelForImageClassification

checkpoint = "nateraw/vit-base-cats-vs-dogs"
feature_extractor = AutoFeatureExtractor.from_pretrained(checkpoint)
model = TFAutoModelForImageClassification.from_pretrained(checkpoint, from_pt=True)
Now we need some data for the model. We use an image of cute cats to test the loaded cat v.s dog classifier. The feature_extractor gives us (normalized) pixel_values which is the main input to 🤗 transformers vision models.
import numpy as np
import requests
from PIL import Image


# We will verify our results on an image of cute cats
url = "http://images.cocodataset.org/val2017/000000039769.jpg"
image = Image.open(requests.get(url, stream=True).raw)

# Batch dimension 1
inputs = feature_extractor(image, return_tensors="tf")
print(f"inputs contains: {list(inputs.keys())}")

# Display the resized image
shape = inputs['pixel_values'].shape[-2:].as_list()

print("resized image:")
image.resize(np.asarray(shape).transpose())
inputs contains: ['pixel_values']
resized image:
Let's check some information.
print(f"preprocessed image size: {inputs['pixel_values'].shape[-2:]}")
print(f"patch size: {model.config.patch_size}")
preprocessed image size: (224, 224)
patch size: 16
The feature extractor resized the image to (224, 224), and each patch is of size (16, 16). Therefore, we have
Previously[*], we mentioned that a sequence of patch embeddings are extracted from an image. The following cell shows how this is done.
This happens behind the scenes when you call the model with the inputs. Here is solely for the purpose of demonstration.
patch_embeddings = model.vit.embeddings.patch_embeddings(inputs["pixel_values"])
print(f"patch_embeddings has shape: {patch_embeddings.shape}")
patch_embeddings has shape: (1, 196, 768)
The shape of patch_embeddings is (1, 196, 768), which indicates a sequence of
The follwoing cell is a convenient utility to visualize the patches (which will be also used later for visualizing the attentions).
import numpy as np


def patch_image(image, patch_size, space=1):

    # disable normalization temporary
    do_normalize = feature_extractor.do_normalize
    feature_extractor.do_normalize = False

    # resize the image
    resized_image = feature_extractor(image).pixel_values[0]

    # compute the number of patches
    rows = resized_image.size[1] // patch_size
    cols = resized_image.size[0] // patch_size
    num_patches = rows * cols

    # space between patches
    ### space = 1

    # compute the shape of the final image
    hight = rows * patch_size + (rows - 1) * space
    width = cols * patch_size + (cols - 1) * space

    # buffer for the final image
    buf = np.zeros(shape=(hight, width, 3))

    # buffer for presenting the patches in a sequence
    buf_1d = np.zeros(shape=(patch_size, num_patches * patch_size + (num_patches - 1) * space, 3))

    # store the extract patches
    patches = []

    resized_array = np.asarray(resized_image)

    for row in range(rows):
        for col in range(cols):

            idx = row * cols + col

            # position in the original (resized) image
            _h_start = row * (patch_size)
            _w_start = col * (patch_size)

            # position in the output image (patches)
            h_start = row * (patch_size + space)
            w_start = col * (patch_size + space)

            # position in the output image (patches as a sequence)
            start = idx * (patch_size + space)

            patch = resized_array[_h_start:_h_start + patch_size, _w_start:_w_start + patch_size, :]
            patches.append(patch)

            buf[h_start:h_start + patch_size, w_start:w_start + patch_size, :] = patch
            buf_1d[0:patch_size, start:start + patch_size, :] = patch

    # restore the original setting
    feature_extractor.do_normalize = do_normalize

    patched = Image.fromarray(buf.astype("uint8"), 'RGB')
    patched_1d = Image.fromarray(buf_1d.astype("uint8"), 'RGB')

return patches, patched, patched_1dpatches, patched, patched_1d = patch_image(image, model.config.patch_size)
display(patched)
print('\n')
# display (partial) patches in sequence
(left, upper, right, lower) = (0, 0, 14 * 6 * (model.config.patch_size + 1), model.config.patch_size)
display(patched_1d.crop(box=(left, upper, right, lower)))Don't worry, No animals were harmed!
Now it's time to let the model guess what's in the image!
import numpy as np
import tensorflow as tf

logits = model(**inputs).logits[0]
probs = tf.math.softmax(logits, axis=-1).numpy()
# predicted class index
pred_id = np.argmax(probs)

print(f"probabilities: {probs.tolist()}")
print(f"predicted label: {model.config.id2label[pred_id]}")
probabilities: [0.9992406368255615, 0.0007594372145831585]
predicted label: cat
Great, the classifier based on pretrained ViT can see 🐈🐈!
We have learned the encoder-decoder architecture in NLP and the vision Transformser for compute vision tasks. Now let's look at the vision-encoder-decoder architecture. As shown in Figure 5, it is the encoder-decoder architecture with its encoder being replaced by an image Transformer encoder, that's it! Images will be encoded by the vision Transformer encoder, which will be used by the text Transformer decoder to generate some texts. The application includes OCR, image captioning, etc. TrOCR is a simple but effective models for text recognition by leveraging pre-trained image Transformer and text Transformer models.
🤗 transformers implements the vision-encoder-decoder architecture in VisionEncoderDecoderModel . Let's see how to use it.
First, we create a vision-encoder-decoder model from the pretrained vision transformer ViT and the pretrained text transformer GPT2.
from transformers import TFVisionEncoderDecoderModel, AutoFeatureExtractor, AutoTokenizer

vision_model_ckpt = "google/vit-base-patch16-224-in21k"
text_model_ckpt = "gpt2"
model = TFVisionEncoderDecoderModel.from_encoder_decoder_pretrained(vision_model_ckpt, text_model_ckpt)

feature_extractor = AutoFeatureExtractor.from_pretrained(vision_model_ckpt)
tokenizer = AutoTokenizer.from_pretrained(text_model_ckpt)
We show the model our cute cats image, and check what the model will say about it 🧐.
def generate(model, feature_extractor, tokenizer, image):

    inputs = feature_extractor(image, return_tensors="tf")

    generations = model.generate(
        inputs["pixel_values"],
        bos_token_id=model.decoder.config.bos_token_id,
        max_length=16, num_beams=4, return_dict_in_generate=True, output_scores=True, output_attentions=True
    )
    generated_ids = generations.sequences
    preds = tokenizer.batch_decode(generated_ids, skip_special_tokens=True)
    preds = [pred.strip() for pred in preds]

    tokens = [tokenizer.convert_ids_to_tokens(x) for x in generated_ids]

    return preds, tokens, generations

preds, _, _ = generate(model, feature_extractor, tokenizer, image)
print(f"generated text: {preds[0]}")
generated text: "I'm not going to say that I'm not going to say that
Wow, the loaded model talks about nothing about our 2 cute cats in the image😢!
For the same reason as in the case of the previously seen encoder-decoder architecture, this model hasn't learned anything about storytelling based on images yet: it can only see images and tell stories independently. The cross attention shown in Figure 5, also called encoder-decoder attention, plays an important role here: it allows the model to generate texts based on the images it sees! When we use the method from_encoder_decoder_pretrained to create an encoder-decoder model, we usually get randomly initialized cross attention weights.
Let's try a fine-tuned image captioning model based on this encoder-decoder model, using the method from_pretrained.
ckpt = "ydshieh/vit-gpt2-coco-en"
finetuned_model = TFVisionEncoderDecoderModel.from_pretrained(ckpt)preds, _, _ = generate(finetuned_model, feature_extractor, tokenizer, image)
print(f"generated text: {preds[0]}")generated text: a cat laying on top of a couch next to another cat
Great 🎉, the model now talks about our 🐈🐈, and the description looks pertinent!
We have seen how to use the model to generate a text associated to an image, by using the method model.generate. This is mainly used for inference. During training, we need to call the model directly with some inputs. In this section, we show you how to do this.
Assume our cute cats image above is associated with 2 labeled captions:
- A couple of cats laying on top of a pink blanket.
- There are two cats laying down with two remotes.
# From now on, we fix the model as the finetuned one.
model = finetuned_model

target_captions = [
    "A couple of cats laying on top of a pink blanket.",
    "There are two cats laying down with two remotes."
]

# The original GPT2 model doesn't have padding token.
# The decoder (GPT2) of this model is slightly modified to use its `eos_token` as `padding_token_id`,
# so we set the tokenizer to use the corresponding token (`<|endoftext|>`) for padding.
tokenizer.pad_token = tokenizer.convert_ids_to_tokens([model.decoder.config.pad_token_id])[0]

target_captions = [x + tokenizer.pad_token for x in target_captions]

# Setup the tokenizer for targets
with tokenizer.as_target_tokenizer():
    encoded = tokenizer(
        target_captions,
        max_length=13,
        return_tensors="tf",
        padding="max_length",
        truncation=True,
        return_attention_mask=True,
    )
    labels, decoder_attention_mask = encoded["input_ids"], encoded["attention_mask"]

print(f"lable token ids - 1: {labels[0].numpy().tolist()}")
print(f"\nlables token ids - 2: {labels[1].numpy().tolist()}")
lable token ids - 1: [32, 3155, 286, 11875, 16299, 319, 1353, 286, 257, 11398, 18447, 13, 50256]
lables token ids - 2: [1858, 389, 734, 11875, 16299, 866, 351, 734, 816, 6421, 13, 50256, 50256]
The inputs for the text decoder are usually the labeled tokens shifted right by one, for performing causal language modeling.
We can use the follwing utility function to shift the tokens.
from transformers.modeling_tf_utils import shape_list


# TODO: Remove this once the PR https://github.com/huggingface/transformers/pull/15175 is merged.
def shift_tokens_right(input_ids: tf.Tensor, pad_token_id: int, decoder_start_token_id: int):

    if pad_token_id is None:
        raise ValueError("Make sure to set the pad_token_id attribute of the model's configuration.")
    pad_token_id = tf.cast(pad_token_id, input_ids.dtype)

    if decoder_start_token_id is None:
        raise ValueError("Make sure to set the decoder_start_token_id attribute of the model's configuration.")
    decoder_start_token_id = tf.cast(decoder_start_token_id, input_ids.dtype)

    start_tokens = tf.fill((shape_list(input_ids)[0], 1), decoder_start_token_id)
    shifted_input_ids = tf.concat([start_tokens, input_ids[:, :-1]], -1)
    # replace possible -100 values in labels by `pad_token_id`
    shifted_input_ids = tf.where(
        shifted_input_ids == -100, tf.fill(shape_list(shifted_input_ids), pad_token_id), shifted_input_ids
    )

    if tf.executing_eagerly():
        # "Verify that `labels` has only positive values and -100"
        assert_gte0 = tf.debugging.assert_greater_equal(shifted_input_ids, tf.constant(0, dtype=input_ids.dtype))

        # Make sure the assertion op is called by wrapping the result in an identity no-op
        with tf.control_dependencies([assert_gte0]):
            shifted_input_ids = tf.identity(shifted_input_ids)

    return shifted_input_ids
Here are what the decoder inputs (along with the labels) look like:
import pandas as pd


decoder_input_ids = shift_tokens_right(
    labels,
    model.decoder.config.pad_token_id,
    model.decoder.config.decoder_start_token_id
)

df = pd.DataFrame(
    [
        [x for x in tokenizer.convert_ids_to_tokens(labels[0])],
        [x for x in tokenizer.convert_ids_to_tokens(decoder_input_ids[0])],
        decoder_attention_mask[0].numpy().tolist(),
        [x for x in tokenizer.convert_ids_to_tokens(labels[1])],
        [x for x in tokenizer.convert_ids_to_tokens(decoder_input_ids[1])],
        decoder_attention_mask[1].numpy().tolist(),
    ],
    index=['label tokens', 'decoder input tokens', 'attention mask', 'label tokens', 'decoder input tokens', 'attention mask'],
)

print(target_captions[0] + "\n")
props = 'border: 2px solid black'
display(df[:3].style.set_table_styles([{'selector': 'td', 'props': props}, {'selector': 'th', 'props': props}]))
A couple of cats laying on top of a pink blanket.<|endoftext|>
| 0 | 1 | 2 | 3 | 4 | 5 | 6 | 7 | 8 | 9 | 10 | 11 | 12 | |
|---|---|---|---|---|---|---|---|---|---|---|---|---|---|
| label tokens | A | Ġcouple | Ġof | Ġcats | Ġlaying | Ġon | Ġtop | Ġof | Ġa | Ġpink | Ġblanket | . | <|endoftext|> |
| decoder input tokens | <|endoftext|> | A | Ġcouple | Ġof | Ġcats | Ġlaying | Ġon | Ġtop | Ġof | Ġa | Ġpink | Ġblanket | . |
| attention mask | 1 | 1 | 1 | 1 | 1 | 1 | 1 | 1 | 1 | 1 | 1 | 1 | 1 |
print(target_captions[1] + "\n")
display(df[3:].style.set_table_styles([{'selector': 'td', 'props': props}, {'selector': 'th', 'props': props}]))
There are two cats laying down with two remotes.<|endoftext|>
| 0 | 1 | 2 | 3 | 4 | 5 | 6 | 7 | 8 | 9 | 10 | 11 | 12 | |
|---|---|---|---|---|---|---|---|---|---|---|---|---|---|
| label tokens | There | Ġare | Ġtwo | Ġcats | Ġlaying | Ġdown | Ġwith | Ġtwo | Ġrem | otes | . | <|endoftext|> | <|endoftext|> |
| decoder input tokens | <|endoftext|> | There | Ġare | Ġtwo | Ġcats | Ġlaying | Ġdown | Ġwith | Ġtwo | Ġrem | otes | . | <|endoftext|> |
| attention mask | 1 | 1 | 1 | 1 | 1 | 1 | 1 | 1 | 1 | 1 | 1 | 1 | 0 |
Now, let's pass the inputs (encoded imaage and texts) to the model:
model_inputs = {
    "pixel_values": inputs["pixel_values"],
    "decoder_input_ids": decoder_input_ids,
    "decoder_attention_mask": decoder_attention_mask,
    "output_attentions": True,
}
outputs = model(**model_inputs)
output_ids = tf.math.argmax(outputs['logits'], axis=-1)
output_texts = tokenizer.batch_decode(output_ids)

print(f"model outputs contains: {list(outputs.keys())}")
print(f"logit shape: {outputs['logits'].shape}")
print(f"encoder's outputs shape: {outputs['encoder_last_hidden_state'].shape}")
print(f"output texts: {output_texts}")
model outputs contains: ['logits', 'past_key_values', 'decoder_attentions', 'cross_attentions', 'encoder_last_hidden_state', 'encoder_attentions']
logit shape: (2, 13, 50257)
encoder's outputs shape: (1, 197, 768)
output texts: ['a cat cats cats laying on a of a bed blanket ', "a's two cats laying on on their pillotes one\n"]
When we provide the (shifted) text <|endoftext|>A couple of cats laying on top of a pink blanket. along with the input image, the model outputs a cat cats cats laying on a of a bed blanket (by predicting each next word/token).
To conclude our discussion on the vision encoder-decoder architecture, let's visualize what the model sees in the image when it generates the caption a cat laying on top of a couch next to another cat previously*. We will use the object generations retruned by generate(), which contains the complete information of generation.
Let's check what generations contains:
_, predicted_tokens, generations = generate(model, feature_extractor, tokenizer, image)
print(f"generated text: {preds[0]}")
timestep = 2
print(f"`generations` is of type {type(generations)} with attributes:\n{list(generations.keys())}\n")
# A tuple: one element per time step
print(f"`cross_attentions` is a {type(generations['cross_attentions'])} of {len(generations['cross_attentions'])} elements\n")
# At each timestep, we get a tuple: one element per layer
print(f"At each timestep, it is a {type(generations['cross_attentions'][timestep])} of {len(generations['cross_attentions'][timestep])} {type(generations['cross_attentions'][timestep][0]).__name__}\n")
# For each layer, we get a tensor:
# shape = (num_beams, num_head, src_seq_len (generated seq. at a specific time step), tgt_seq_len (encoder input length))
print(f"Each tensor has a shape: {generations['cross_attentions'][timestep][0].shape}")We want to know what the model sees in the image when it generates the token cat.
Here is an utility function to get cross attentions for this purpose.
def get_attentions(generations, position_idx, decoder_layer_idx=-1, beam_idx=0):

    num_heads = generations["cross_attentions"][position_idx][decoder_layer_idx].shape[1]

    attentions = []
    for head_idx in range(num_heads):
        attentions.append(generations["cross_attentions"][position_idx][decoder_layer_idx][beam_idx][head_idx][-1].numpy())

    average_attentions = np.mean(attentions, axis=0)

    return average_attentions, tuple(attentions)
The third token in the generation is cat, so let's get the cross attentions at the timestep index 2.
(We take the attentions from the last decoder layer.)
position_idx = 2
print(predicted_tokens[0][position_idx].replace("Ġ", ""))attentions, _ = get_attentions(
generations,
position_idx=position_idx,
)
print(f"The attention has shape: {attentions.shape}")
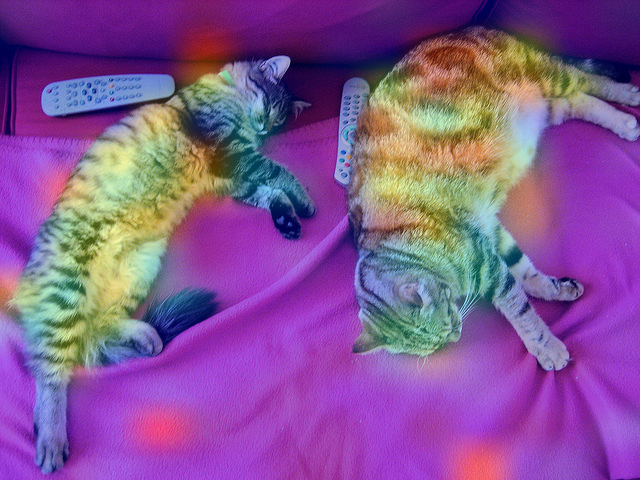
print(f"The attention has a sum {np.sum(attentions)}")The attention is a probability distribution over the input sequence, (i.e. the image patches), which tells us in which parts in the image the model sees cat. The following utility function returns some visualizations that reveal what in an image the model attends to while generating a specific token.
import matplotlib.cm as cm

def get_visualizations(image, patches, attentions, resized_size):

    # remove the [CLS]
    probs = attentions[1:]
    probs = np.array(probs)
    # rescale to [0, 1]
    probs = probs / np.amax(probs)
    # shape = (num_patches, patch_size, patch_size, num_channels)
    patches = np.array(patches)

    # use attention to weight the patches
    n_patches = len(patches)
    weighted_patches = probs.reshape((n_patches, 1, 1, 1)) * patches

    (height, width) = (resized_size, resized_size) if type(resized_size) == int else resized_size
    patch_size = patches[0].shape[0]
    n_rows = height // patch_size
    n_cols = width // patch_size

    # compute the weighted image
    buf = np.zeros(shape=(height, width) + (3, ))
    # along height
    for row in range(n_rows):
        # along width
        for col in range(n_cols):
            index = n_cols * row + col
            patch_pixel_values = weighted_patches[index]

            h_start, h_end = row * patch_size, (row + 1) * patch_size
            w_start, w_end = col * patch_size, (col + 1) * patch_size

            buf[h_start:h_end, w_start:w_end, :] = patch_pixel_values

    weighted_image = tf.keras.utils.array_to_img(buf)

    # Heatmap
    heatmap = probs.reshape(n_rows, n_cols)
    heatmap = np.uint8(255 * heatmap)

    jet = cm.get_cmap("jet")
    jet_colors = jet(np.arange(256))[:, :3]
    jet_heatmap = jet_colors[heatmap]
    jet_heatmap = tf.keras.utils.array_to_img(jet_heatmap)
    jet_heatmap = jet_heatmap.resize(image.size)
    jet_heatmap = tf.keras.utils.img_to_array(jet_heatmap)

    superimposed_img = jet_heatmap * 0.33794 + np.asarray(image) * (1 - 0.33794)
    superimposed_img = tf.keras.utils.array_to_img(superimposed_img)

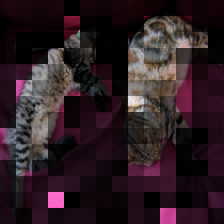
return weighted_image, heatmap, superimposed_imgweighted_image, heatmap, superimposed_img = get_visualizations(image, patches, attentions, feature_extractor.size)weighted_imageimport matplotlib.pyplot as plt
plt.matshow(heatmap)superimposed_imgThe above images tells us that, when the model generates the (first) cat in a cat laying on top of a couch next to another cat, it pays attention to the 2 cute cats!
Let's check for the second occurrence of cat in the generation:
position_idx = 12
print(predicted_tokens[0][position_idx].replace("Ġ", ""))

attentions, _ = get_attentions(generations, position_idx=position_idx)
weighted_image, heatmap, superimposed_img = get_visualizations(image, patches, attentions, feature_extractor.size)

weighted_image
cat
Surprisingly, this time, the model pays attention to anything but the 2 cats 😞 and yet is able to generate the word cat!
Let's pass this (weighted) image, where the cats are almost invisible, to the model and see what the model generates:
preds, _, _ = generate(model, feature_extractor, tokenizer, weighted_image)
print(preds)
['a cat laying on top of a pink blanket']
The model is still able to generate cat, kind mysterious 🤔!
