< English | 中文 >
本指南将引导你如何在具有 Intel GPUs 的 Windows 系统上安装 IPEX-LLM。
Note
如果是在 Intel Arc B 系列 GPU 上安装(例,B580),请参阅本指南。
Note
如果是在 Linux 系统上安装,请参阅本指南。
适用于 Intel Core Ultra 和 Core 11-14 代集成的 GPUs (iGPUs),以及 Intel Arc 系列 GPU。
Important
如果你的驱动程序版本低于 31.0.101.5122,请更新 GPU 驱动程序。 可参考此处获取更多信息。
可以从 Intel 官方下载页面下载并安装最新的 GPU 驱动程序。更新后需要重启以完成安装。
Note
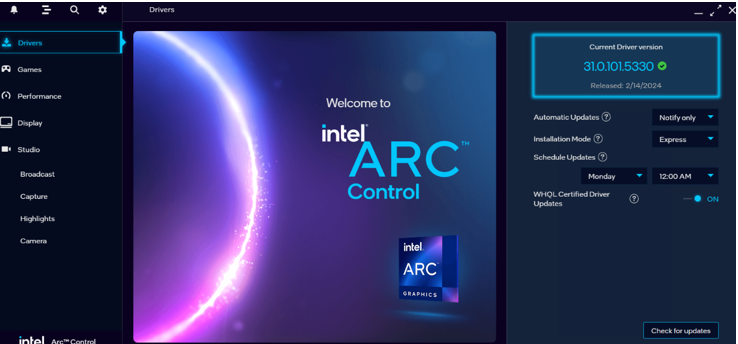
该过程可能需要大约 10 分钟。重启后,检查 Intel Arc Control 应用程序以验证驱动程序是否已正确安装。如果安装成功,应该会看到类似下图的 Arc Control 界面。
访问 Miniforge 安装页面,下载 适用于 Windows 的 Miniforge 安装程序,并按照说明步骤完成安装。
安装完成后,打开 Miniforge Prompt,创建一个新的 Python 环境 llm :
conda create -n llm python=3.11 libuv激活新创建的环境 llm:
conda activate llm在 llm 环境处于激活状态下,使用 pip 安装适用于 GPU 的 ipex-llm。
-
对于处理器编号为 2xxV 的第二代 Intel Core™ Ultra Processors (代号 Lunar Lake):
可以根据区域选择不同的
extra-index-url,提供 US 和 CN 两个选项:-
US:
conda create -n llm python=3.11 libuv
conda activate llm

pip install --pre --upgrade ipex-llm[xpu_lnl] --extra-index-url https://pytorch-extension.intel.com/release-whl/stable/lnl/us/
-
CN:
conda create -n llm python=3.11 libuv
conda activate llm

pip install --pre --upgrade ipex-llm[xpu_lnl] --extra-index-url https://pytorch-extension.intel.com/release-whl/stable/lnl/cn/
-
-
对于其他 Intel iGPU 和 dGPU:
可以根据区域选择不同的
extra-index-url,提供 US 和 CN 两个选项:-
US:
conda create -n llm python=3.11 libuv
conda activate llm

pip install --pre --upgrade ipex-llm[xpu] --extra-index-url https://pytorch-extension.intel.com/release-whl/stable/xpu/us/
-
CN:
conda create -n llm python=3.11 libuv
conda activate llm

pip install --pre --upgrade ipex-llm[xpu] --extra-index-url https://pytorch-extension.intel.com/release-whl/stable/xpu/cn/
-
Note
如果在安装 IPEX 时遇到网络问题,请参阅本指南获取故障排除建议。
你可以通过以下步骤验证 ipex-llm 是否已安装成功。
-
打开 Miniforge Prompt,激活已创建的 Python 环境
llm:conda activate llm
-
根据你的设备,设置以下环境参数:
-
Intel iGPU and Intel Arc™ A770:
set SYCL_CACHE_PERSISTENT=1
-
Tip
对于其他的 Intel dGPU 系列,请参阅此指南了解有关运行时配置的更多详细信息。
-
在 Miniforge Prompt 窗口中,通过输入
python并按下 Enter 键以启动 Python 交互式控制台。 -
请在 Miniforge Prompt 中逐行复制 以下代码,每复制一行后按 Enter 键。
import torch
from ipex_llm.transformers import AutoModel,AutoModelForCausalLM
tensor_1 = torch.randn(1, 1, 40, 128).to('xpu')
tensor_2 = torch.randn(1, 1, 128, 40).to('xpu')
print(torch.matmul(tensor_1, tensor_2).size())
最后会输出如下内容:
torch.Size([1, 1, 40, 40])提示:
如果您遇到任何问题,请参阅这里寻求帮助。
-
退出 Python 交互式控制台,只需按 Ctrl+Z,然后按下 Enter 键(或者输入
exit(),再按 Enter 键)。
要监控 GPU 性能和状态 (例如内存消耗、利用率等),你可以 使用 Windows 任务管理器的 性能 选项卡(参见下图左侧)或 Arc Control 应用程序(参见下图右侧)
现在让我们实际运行一个大型语言模型(LLM)。本示例将使用 Qwen2-1.5B-Instruct 模型,一个拥有15亿参数的LLM。 请按照以下步骤设置和运行模型,并观察它如何对提示词 "What is AI?" 做出响应。
-
步骤 1: 按照上述 运行时配置章节,准备运行时环境。
-
步骤 2: 创建代码文件。IPEX-LLM 支持从 Hugging Face 或 ModelScope 加载模型。请根据你的需求选择。
-
从 Hugging Face 加载模型:
创建一个名为
demo.py新文件,并将如下代码复制进其中,从而运行基于 IPEX-LLM 优化的 Qwen2-1.5B-Instruct 模型。# Copy/Paste the contents to a new file demo.py import torch from ipex_llm.transformers import AutoModelForCausalLM from transformers import AutoTokenizer, GenerationConfig generation_config = GenerationConfig(use_cache=True) print('Now start loading Tokenizer and optimizing Model...') tokenizer = AutoTokenizer.from_pretrained("Qwen/Qwen2-1.5B-Instruct", trust_remote_code=True) # Load Model using ipex-llm and load it to GPU model = AutoModelForCausalLM.from_pretrained("Qwen/Qwen2-1.5B-Instruct", load_in_4bit=True, cpu_embedding=True, trust_remote_code=True) model = model.to('xpu') print('Successfully loaded Tokenizer and optimized Model!') # Format the prompt # you could tune the prompt based on your own model, # here the prompt tuning refers to https://huggingface.co/Qwen/Qwen2-1.5B-Instruct#quickstart question = "What is AI?" messages = [ {"role": "system", "content": "You are a helpful assistant."}, {"role": "user", "content": question} ] text = tokenizer.apply_chat_template( messages, tokenize=False, add_generation_prompt=True ) # Generate predicted tokens with torch.inference_mode(): input_ids = tokenizer.encode(text, return_tensors="pt").to('xpu') print('--------------------------------------Note-----------------------------------------') print('| For the first time that each model runs on Intel iGPU/Intel Arc™ A300-Series or |') print('| Pro A60, it may take several minutes for GPU kernels to compile and initialize. |') print('| Please be patient until it finishes warm-up... |') print('-----------------------------------------------------------------------------------') # To achieve optimal and consistent performance, we recommend a one-time warm-up by running `model.generate(...)` an additional time before starting your actual generation tasks. # If you're developing an application, you can incorporate this warm-up step into start-up or loading routine to enhance the user experience. output = model.generate(input_ids, do_sample=False, max_new_tokens=32, generation_config=generation_config) # warm-up print('Successfully finished warm-up, now start generation...') output = model.generate(input_ids, do_sample=False, max_new_tokens=32, generation_config=generation_config).cpu() output_str = tokenizer.decode(output[0], skip_special_tokens=False) print(output_str)
-
从 ModelScope 加载模型:
请在 Miniforge Prompt 中运行以下命令来安装 ModelScope:
pip install modelscope==1.11.0创建一个名为
demo.py新文件,并将如下代码复制进其中,从而运行基于 IPEX-LLM 优化的 Qwen2-1.5B-Instruct 模型。# Copy/Paste the contents to a new file demo.py import torch from ipex_llm.transformers import AutoModelForCausalLM from transformers import GenerationConfig from modelscope import AutoTokenizer generation_config = GenerationConfig(use_cache=True) print('Now start loading Tokenizer and optimizing Model...') tokenizer = AutoTokenizer.from_pretrained("Qwen/Qwen2-1.5B-Instruct", trust_remote_code=True) # Load Model using ipex-llm and load it to GPU model = AutoModelForCausalLM.from_pretrained("Qwen/Qwen2-1.5B-Instruct", load_in_4bit=True, cpu_embedding=True, trust_remote_code=True, model_hub='modelscope') model = model.to('xpu') print('Successfully loaded Tokenizer and optimized Model!') # Format the prompt # you could tune the prompt based on your own model, # here the prompt tuning refers to https://huggingface.co/Qwen/Qwen2-1.5B-Instruct#quickstart question = "What is AI?" messages = [ {"role": "system", "content": "You are a helpful assistant."}, {"role": "user", "content": question} ] text = tokenizer.apply_chat_template( messages, tokenize=False, add_generation_prompt=True ) # Generate predicted tokens with torch.inference_mode(): input_ids = tokenizer.encode(text, return_tensors="pt").to('xpu') print('--------------------------------------Note-----------------------------------------') print('| For the first time that each model runs on Intel iGPU/Intel Arc™ A300-Series or |') print('| Pro A60, it may take several minutes for GPU kernels to compile and initialize. |') print('| Please be patient until it finishes warm-up... |') print('-----------------------------------------------------------------------------------') # To achieve optimal and consistent performance, we recommend a one-time warm-up by running `model.generate(...)` an additional time before starting your actual generation tasks. # If you're developing an application, you can incorporate this warm-up step into start-up or loading routine to enhance the user experience. output = model.generate(input_ids, do_sample=False, max_new_tokens=32, generation_config=generation_config) # warm-up print('Successfully finished warm-up, now start generation...') output = model.generate(input_ids, do_sample=False, max_new_tokens=32, generation_config=generation_config).cpu() output_str = tokenizer.decode(output[0], skip_special_tokens=False) print(output_str)
提示:
请注意,有些模型在 ModelScope 上的 repo id 可能与 Hugging Face 不同。
-
Note
在内存有限的 Intel iGPU 上运行大语言模型时,我们建议在 from_pretrained 函数中设置 cpu_embedding=True。这将使内存占用较大的 embedding 层使用 CPU 而非 GPU。
-
步骤 3. 使用以下命令在激活的
Python环境llm中运行demo.py:python demo.py
以下是在一个配备 Intel Core Ultra 5 125H CPU 和 Intel Arc Graphics iGPU 的系统上的示例输出:
<|im_start|>system
You are a helpful assistant.<|im_end|>
<|im_start|>user
What is AI?<|im_end|>
<|im_start|>assistant
Artificial Intelligence (AI) refers to the simulation of human intelligence in machines that are programmed to think and act like humans. It involves the development of algorithms,
首次在 GPU 上运行大语言模型时,你可能会注意到性能低于预期,在生成第一个 token 之前可能会有长达几分钟的延迟。发生这种延迟是因为 GPU 内核需要编译和初始化,这在不同类型的 GPU 之间会有所差异。为获得最佳且稳定的性能,我们推荐在正式生成任务开始之前,额外运行一次 model.generate(...) 做为 warm-up。如果你正在开发应用程序,你可以将此 warm-up 步骤集成到启动或加载流程中以加强用户体验。


